This guide will walk you through the steps to set up a fault-tolerant, scalable, and highly available EDB Postgres Advanced Server release 14 cluster using EDB Failover Manager version 4.5 on Ubuntu 20.04. These steps can also be applied if you are running an earlier release of Ubuntu 18.04 or Debian 10.
EDB Postgres high availability cluster comprised of the following components:
- EDB Postgres Advanced Server is a commercially licensed, enhanced version of the open-source PostgreSQL database engine, developed and maintained by EnterpriseDB (EDB). It is designed for enterprise-class workloads and provides additional features and capabilities that are not available in the open-source Postgres version.
- EDB Failover Manager (EFM) is a high-availability and disaster recovery solution for Postgres and EDB Postgres Advanced Server, developed and maintained by EnterpriseDB (EDB). EFM allows for automatic failover and failback of Postgres and EDB Postgres Advanced Server databases, in the event of a primary server failure, with minimal data loss and minimal disruption to the end-users.
- PgBouncer is an open-source, lightweight, single-binary connection pooler for PostgreSQL. PgBouncer maintains a pool of connections for each unique user, database pair. It’s typically configured to hand out one of these connections to a new incoming client connection, and return it back in to the pool when the client disconnects.
Some of the key features of EDB Postgres Advanced Server include:
- Oracle Compatibility: It provides compatibility with Oracle Database, allowing organizations to easily port their Oracle applications and skills to EDB Postgres Advanced Server.
- Advanced Security: It provides advanced security features such as data encryption, role-based access control, and auditing.
- Performance Optimization: It includes performance optimization features such as parallel query execution, partitioning, and indexing.
- Management and Monitoring: It provides tools for managing and monitoring the database, such as the EDB Postgres Enterprise Manager, which allows for easy management of the database environment.
- High Availability and Disaster Recovery: It provides features for high availability and disaster recovery, such as replication, failover, and backups.
EDB Failover Manager (EFM) provides several features to help ensure high availability and disaster recovery:
- Automatic failover: EFM can automatically detect when a primary server has failed and promote one of the available standby servers to take its place, with minimal data loss.
- Automatic failback: EFM can automatically detect when the primary server has recovered and promote it back to the primary server, with minimal disruption to the end-users.
- Monitoring and alerting: EFM can monitor the health of the servers in the cluster and provide alerts when there are issues that need attention.
- Multi-master replication: EFM supports multi-master replication, which allows for automatic failover and failback between multiple primary servers.
- Cluster management: EFM provides a web-based interface for managing and monitoring the EFM cluster.
EDB Postgres Advanced Server, and open source Postgres are both relational database management systems (RDBMS) that are based on the PostgreSQL database engine. However, there are some key differences between the two:
- Postgres Community Version is open source, and primarily a transactional database system of the PostgreSQL database engine. It is developed and maintained by a global community of contributors, and its features and capabilities are determined by the community's consensus. It comes with a wide range of free and open-source plugins and extensions for various use cases and workloads. Since Postgres community version is free and open-source, it can be used for any purpose, including commercial use.
- EDB Postgres Advanced Server is a commercially licensed, enhanced version of the open-source PostgreSQL database engine, developed and maintained by EnterpriseDB (EDB). It includes additional features and capabilities that are not available in the open-source Postgres version, such as advanced security, performance, and management features. Postgres Advanced Server offers a wide range of commercial plugins and extensions that are tailored to specific use cases and workloads, such as EDB Failover Manager, EDB Backup and Recovery, and EDB Replication Server. EDB Postgres Advanced Server is geared towards enterprise-class workloads and provides additional features such as Oracle compatibility, Advanced security, and performance optimization.
EDB Postgres System Requirement
The minimum system requirements for running EDB Postgres Advanced Server will depend on the specific version you are using and the workloads you plan to run on it. However, in general, the following are some of the minimum system requirements you should consider:
- CPU: At least 2 cores of a 64-bit CPU.
- Memory: At least 4 GB of RAM.
- Disk Space: At least 2 GB of free disk space for the software, and additional space for data storage.
- Operating System: EDB Postgres Advanced Server is supported on a variety of Linux distributions, including Red Hat Enterprise Linux, CentOS, Oracle Linux, Debian, Ubuntu, and SLES. Windows and MacOS are also supported.
- Network: A reliable and fast network connection is essential for replication and other high availability and disaster recovery features.
It is important to note that these are general minimum requirements, and actual requirements will depend on the specific version of EDB Postgres Advanced Server you are using, the size and complexity of your workloads, the number of concurrent users, and other factors. It is always recommended to check the official documentation or consult with EDB support for the specific version you are planning to use.
Basic Environment
For the demonstration purpose, we will start with the basic environment to set up a 3-node EDB Postgres HA Cluster on three separate virtual machines.
The steps described in this tutorial to build a high availability cluster with EDB Postgres, and Failover Manager (EFM) will remain same irrespective of underlying (physical or virtual) machines you have in your environment.
Prepare your Ubuntu to run EDB Postgres HA Cluster
Now that you have understood EDB Postgres high availability cluster components, and its requirement, so lets begin with the following steps to build a highly available cluster with EDB Postgres version 14 on Ubuntu 20.04.
Log in to your Ubuntu using a non-root user with sudo privileges, and execute the following command to set correct timezone:
sudo timedatectl set-timezone Asia/KarachiMake sure you repeat the same on each node before proceeding to next.
Edit /etc/hosts file:
sudo nano /etc/hostsAdd your nodes, and their IP Addresses like below:
192.168.10.1    edb_postgres1
192.168.10.2    edb_postgres2
192.168.10.3    edb_postgres3
Save and close the editor when you are finished.
Make sure you repeat the same on each node before proceeding to next.
Configure UFW Firewall
If UFW firewall is active on your Ubuntu, then you have to configure it properly. The ports that are required to run EDB Postgres HA cluster are the following:
- 5444 Postgres Advanced Server standard port.
- 7800 EFM standard port.
- 6432 PgBouncer standard port.
You can allow required ports from your Ubuntu UFW firewall using the following command:
sudo ufw allow 5444/tcp
sudo ufw allow 7800/tcpsudo ufw allow 7809/tcpsudo ufw allow 6432/tcp
sudo ufw reload
Make sure you repeat the same on each node before proceeding to next.
Add EDB APT Repository
You should have a registered user account with EDB in order to access, and install required packages from EDB software repository.
From a web browser, access EDB repository link with your registered credentials.
- Select platform
- Select software
Copy automatic repository installation script.
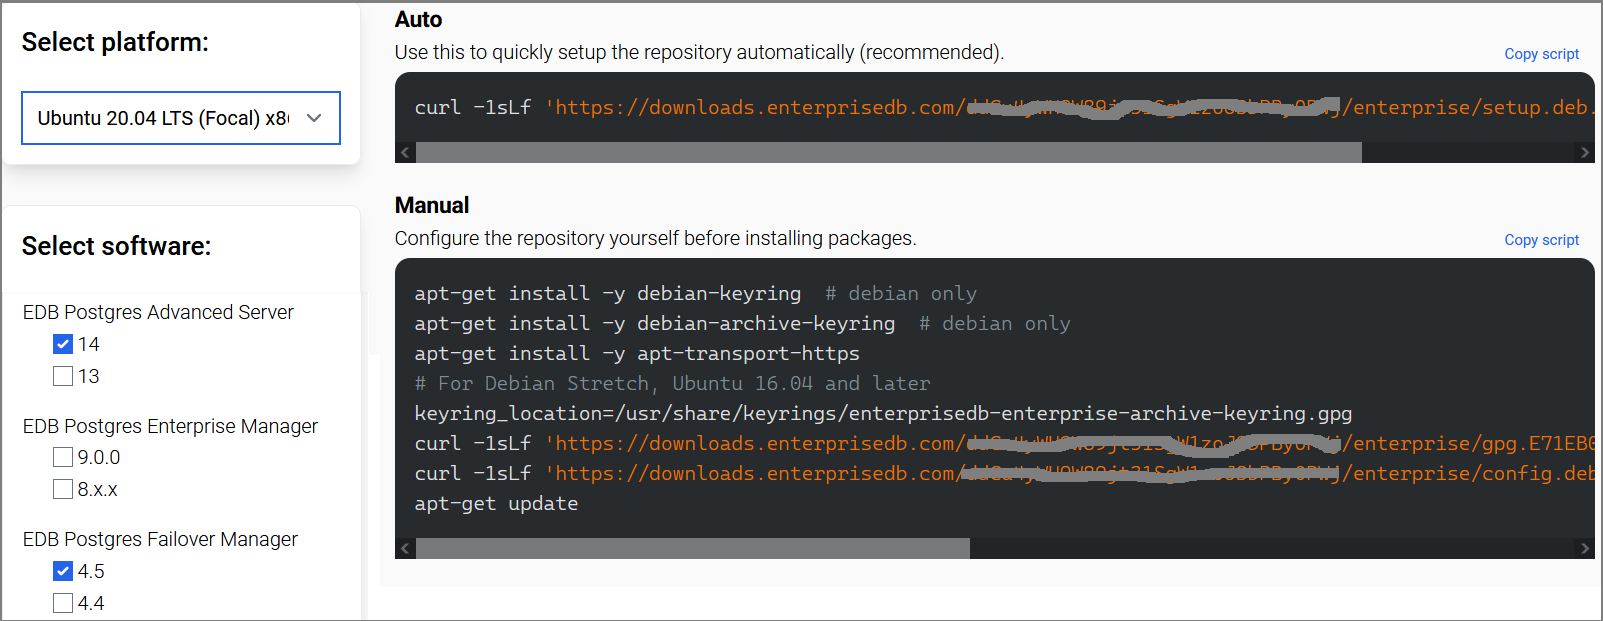
Execute automatic repository installation script on your Ubuntu:
curl -1sLf 'https://downloads.enterprisedb.com/Replace_With_Your_Authentication_Token/enterprise/setup.deb.sh' | sudo -E bash

sudo apt update
Make sure you repeat the same on your remaining nodes before proceeding to next.
Install EDB Postgres Advanced Server
Type following command to install EDB Postgres release 14 on your Ubuntu:
sudo apt install -y edb-as14-server

sudo ln -s /usr/lib/edb-as/14/bin/* /usr/bin/
Make sure you repeat the same step on your remaining nodes before proceeding to next.
Configure EDB Postgres Streaming Replication on Primary
Log in to your (edb_postgres1) in our case, and configure Postgres streaming replication on your primary node first.
Edit pg_hba.conf to make the required changes:
sudo nano /etc/edb-as/14/main/pg_hba.conf
Add your primary and standby nodes in pg_hba.conf file like below:
# IPv4 local connections:
host    all             all             192.168.10.1/32         trust
host    all             all             192.168.10.2/32         trust
host    all             all             192.168.10.3/32         trust

# Allow replication connections from localhost, by a user with the
# replication privilege.
host    replication     replication     192.168.10.1/32         md5
host    replication     replication     192.168.10.2/32         md5
host    replication     replication     192.168.10.3/32         md5
Save and close the editor when you are finished.
Execute following command to create a database replication role:
sudo -u enterprisedb createuser -U enterprisedb replication -P -c 5 --replication
This will prompt you to set password for replication role you are creating.
You will also need to set password for enterprisedb account using the following command:
sudo -u enterprisedb psql edb -c "ALTER USER enterprisedb PASSWORD 'Type_Strong_Password_Here';"Restart EDB Postgres to make the changes effect:
sudo systemctl restart edb-as@14-main.service
At this stage, EDB Postgres streaming replication configuration is completed on primary node. In the next step we will configure Postgres streaming replication on standby replica nodes.
Configure EDB Postgres Streaming Replication on Standby
Log in to your (edb_postgres2) in our case, and configure Postgres streaming replication on standby replica server.
Stop EDB Postgres on your standby node using the following command:
sudo systemctl stop edb-as@14-main.service
Remove everything from EDB Postgres data directory:
sudo su - enterprisedb

rm -rf /var/lib/edb-as/14/main/*

exit
We will use pg_basebackup command-line tool to create a physical backup of primary database, and writes them to a standby replica server Postgres data directory.
Type following command on your standby node:
sudo -u enterprisedb pg_basebackup -h edb_postgres1 -p 5444 -U replication -D /var/lib/edb-as/14/main/ -Fp -Xs -RThis will prompt you to enter replication role password you created on your primary server. It will take a moment to complete the process.
Edit pg_hba.conf to make the required changes:
sudo nano /etc/edb-as/14/main/pg_hba.conf
Add your primary and standby nodes in pg_hba.conf file like below:
# IPv4 local connections:
host    all             all             192.168.10.1/32         trust
host    all             all             192.168.10.2/32         trust
host    all             all             192.168.10.3/32         trust

# Allow replication connections from localhost, by a user with the
# replication privilege.
host    replication     replication     192.168.10.1/32         md5
host    replication     replication     192.168.10.2/32         md5
host    replication     replication     192.168.10.3/32         md5
Save and close the editor when you are finished.
Start EDB Postgres on your standby node:
sudo systemctl start edb-as@14-main.service
Make sure you repeat the same on your remaining standby nodes before proceeding to next.
Verify Postgres Streaming Replication
When you are finished with Postgres streaming replication configuration as described, proceed with the following steps to verify streaming replication status.
From your primary server (edb_postgres1) in our case, execute following command to check streaming replication:
sudo -u enterprisedb psql edb -c "SELECT client_addr, state FROM pg_stat_replication;"
You will see the output similar to like as shown in image below:

Now that your EDB Postgres streaming replication is working as intended, you can proceed to install and configure EDB Failover Manager (EFM) as described in the following step.
Install EDB Failover Manager (EFM)
EDB Failover Manager (EFM) is a high-availability and disaster recovery solution for Postgres Advanced Server.
Type following command to install EDB Failover Manager version 4.5 on Ubuntu:
sudo apt -y install edb-efm45

sudo ln -s /usr/edb/efm-4.5/bin/* /usr/bin/
Make sure you repeat the same on your remaining nodes before proceeding to next.
Configure EDB Failover Manager (EFM) on Primary
Log in to your (edb_postgres1) in our case, and configure EFM cluster on your primary node first.
Add a default database superuser (enterprisedb) to efm group:
sudo usermod -aG efm enterprisedbThis will allow database superuser (enterprisedb) to perform management functions on behalf of Failover Manager.
Copy efm properties template file, and efm nodes template file:
sudo cp -p /etc/edb/efm-4.5/efm.properties.in /etc/edb/efm-4.5/efm.properties

sudo cp -p /etc/edb/efm-4.5/efm.nodes.in /etc/edb/efm-4.5/efm.nodes
Set appropriate permission on efm properties file, and efm nodes file:
sudo chown efm:efm /etc/edb/efm-4.5/efm.properties
sudo chmod 666 /etc/edb/efm-4.5/efm.properties

sudo chown efm:efm /etc/edb/efm-4.5/efm.nodes
sudo chmod 666 /etc/edb/efm-4.5/efm.nodes
Generate an encrypted password for enterprisedb role:
sudo efm encrypt efm
This will prompt you enter password and confirm password. Make sure you enter the same password you have for your enterprisedb role in the database.
Copy encrypted password as you will need it to place in /etc/edb/efm-4.5/efm.properties file
Edit /etc/edb/efm-4.5/efm.properties file to make the required changes:
sudo nano /etc/edb/efm-4.5/efm.properties
Replace following configuration settings with yours:
db.user=enterprisedb
db.password.encrypted=Type_Encrypted_Password_Here
db.port=5444
db.database=edb
db.service.owner=enterprisedb
db.service.name=edb-as@14-main.service
db.bin=/usr/lib/edb-as/14/bin
db.data.dir=/var/lib/edb-as/14/main
db.config.dir=/etc/edb-as/14/main
bind.address=192.168.10.1:7800
is.witness=false
user.email=support@techsupportpk.com
ping.server.ip=192.168.10.100
auto.allow.hosts=true
stable.nodes.file=true
virtual.ip=192.168.10.200
virtual.ip.interface=enp0s8
virtual.ip.prefix=24
virtual.ip.single=true
efm.loglevel=TRACE
Save and close the editor when you are finished.
Virtual IP addresses aren't supported by many cloud providers. If you are working on those environments, use another method, such as an elastic IP address on AWS, that can be changed when needed by a fencing or post-promotion script.
Edit /etc/edb/efm-4.5/efm.nodes file:
sudo nano /etc/edb/efm-4.5/efm.nodes
Add your standby nodes:
192.168.10.2:7800 192.168.10.3:7800
Save and close the editor when you are finished.
Configure EDB Failover Manager (EFM) on Standby
Log in to your (edb_postgres2) in our case, and configure efm cluster manager on your standby node.
Add a default database superuser (enterprisedb) to efm group:
sudo usermod -aG efm enterprisedb
This will allow database superuser (enterprisedb) to perform management functions on behalf of Failover Manager.
Copy efm properties template file, and efm nodes template file:
sudo cp -p /etc/edb/efm-4.5/efm.properties.in /etc/edb/efm-4.5/efm.properties

sudo cp -p /etc/edb/efm-4.5/efm.nodes.in /etc/edb/efm-4.5/efm.nodes
Set appropriate permission:
sudo chown efm:efm /etc/edb/efm-4.5/efm.properties
sudo chmod 666 /etc/edb/efm-4.5/efm.properties

sudo chown efm:efm /etc/edb/efm-4.5/efm.nodes
sudo chmod 666 /etc/edb/efm-4.5/efm.nodes
Edit /etc/edb/efm-4.5/efm.properties file to make the required changes:
sudo nano /etc/edb/efm-4.5/efm.properties
Replace following configuration settings with yours:
db.user=enterprisedb
db.password.encrypted=Type_Encrypted_Password_Here
db.port=5444
db.database=edb
db.service.owner=enterprisedb
db.service.name=edb-as@14-main.service
db.bin=/usr/lib/edb-as/14/bin
db.data.dir=/var/lib/edb-as/14/main
db.config.dir=/etc/edb-as/14/main
bind.address=192.168.10.2:7800
is.witness=false
user.email=support@techsupportpk.com
ping.server.ip=192.168.10.100
auto.allow.hosts=true
stable.nodes.file=true
virtual.ip=192.168.10.200
virtual.ip.interface=enp0s8
virtual.ip.prefix=24
virtual.ip.single=true
efm.loglevel=TRACE
Save and close the editor when you are finished.
Edit /etc/edb/efm-4.5/efm.nodes file:
sudo nano /etc/edb/efm-4.5/efm.nodes
Add your primary, and standby nodes:
192.168.10.3:7800 192.168.10.1:7800
Save and close the editor when you are finished.
Log in to your (edb_postgres3) in our case, and configure efm cluster manager on your standby node.
Add a default database superuser (enterprisedb) to efm group:
sudo usermod -aG efm enterprisedbThis will allow database superuser (enterprisedb) to perform management functions on behalf of Failover Manager.
Copy efm properties template file, and efm nodes template file:
sudo cp -p /etc/edb/efm-4.5/efm.properties.in /etc/edb/efm-4.5/efm.properties

sudo cp -p /etc/edb/efm-4.5/efm.nodes.in /etc/edb/efm-4.5/efm.nodes
Set appropriate permission:
sudo chown efm:efm /etc/edb/efm-4.5/efm.properties
sudo chmod 666 /etc/edb/efm-4.5/efm.properties

sudo chown efm:efm /etc/edb/efm-4.5/efm.nodes
sudo chmod 666 /etc/edb/efm-4.5/efm.nodes
Edit /etc/edb/efm-4.5/efm.properties file to make the required changes:
sudo nano /etc/edb/efm-4.5/efm.properties
Replace following configuration settings with yours:
db.user=enterprisedb
db.password.encrypted=Type_Encrypted_Password_Here
db.port=5444
db.database=edb
db.service.owner=enterprisedb
db.service.name=edb-as@14-main.service
db.bin=/usr/lib/edb-as/14/bin
db.data.dir=/var/lib/edb-as/14/main
db.config.dir=/etc/edb-as/14/main
bind.address=192.168.10.3:7800
is.witness=false
user.email=support@techsupportpk.com
ping.server.ip=192.168.10.100
auto.allow.hosts=true
stable.nodes.file=true
virtual.ip=192.168.10.200
virtual.ip.interface=enp0s8
virtual.ip.prefix=24
virtual.ip.single=true
efm.loglevel=TRACE
Save and close the editor when you are finished.
Edit /etc/edb/efm-4.5/efm.nodes file:
sudo nano /etc/edb/efm-4.5/efm.nodes
Add your primary, and standby nodes:
192.168.10.2:7800 192.168.10.1:7800
Save and close the editor when you are finished.
Start EDB Failover Manager on Primary
Log in to your (edb_postgres1) in our case, and execute following command to start efm cluster manager on your primary node first:
sudo systemctl start edb-efm-4.5.service
Verify EFM cluster manager:
sudo systemctl status edb-efm-4.5.service

If efm fails to start, see the startup log for information about what went wrong.
tail -f /var/log/efm-4.5/startup-efm.log
Most of the time, efm cluster fails to start in first attempt due to VIP address assignment. If you see following log entry in efm startup log, just restart your efm cluster using sudo systemctl restart edb-efm-4.5.service command.

When your efm is active and running, you can add your standby nodes in efm cluster using the following command:
sudo efm allow-node efm 192.168.10.2

sudo efm allow-node efm 192.168.10.3
Make sure your efm cluster is active and running on your primary node as described, before proceeding with the following step.
Start EDB Failover Manager on Standby
Log in to your (edb_postgres2) in our case, and execute following command to start failover manager on your standby node:
sudo systemctl start edb-efm-4.5.service
Add your primary, and standby nodes in efm cluster:
sudo efm allow-node efm 192.168.10.3

sudo efm allow-node efm 192.168.10.1
Log in to your (edb_postgres3) in our case, and execute following command to start edb failover manager on your standby node:
sudo systemctl start edb-efm-4.5.service
Add your primary, and standby nodes in efm cluster:
sudo efm allow-node efm 192.168.10.2

sudo efm allow-node efm 192.168.10.1
Verify EDB Failover Manager
From any of your nodes, execute following command monitor your efm cluster manager:
efm cluster-status efm
The efm cluster-status output shows a cluster named efm that has three nodes running:
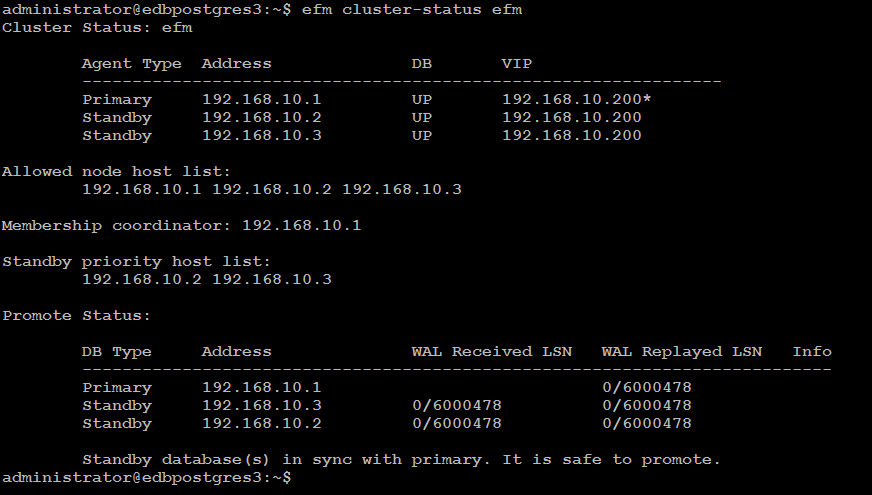
The cluster status section shows the status of the efm agents that running on each node of the cluster:

The asterisk (*) after the VIP address indicates that the address is available for connections. If a VIP address is not followed by an asterisk, the address was associated with the node in the efm properties file, but the address isn't currently in use.
The Allowed node host list and Standby priority host list provide an easy way to see the nodes that can join the cluster and the promotion order of the nodes.

The IP address of the membership coordinator is also displayed in the output.
The Promote Status section in the output is the result of a direct query from the node on which you are invoking the cluster-status command to each database in the cluster.

Now that your efm cluster is up, and running, you can proceed with the following step to test failover/switchover function.
Perform a Failover/Switchover
If the efm cluster status output shows that the primary and standby nodes are in sync as described in the above section of the tutorial, you can perform a manual switchover to test your EDB high availability cluster.
From any of your nodes, type following command to perform a manual failover to a standby replica node:
sudo efm promote efm -switchover
Use the -switchover switch to promote and reconfigure the primary as a new standby.

Type following command to check efm cluster status:
efm cluster-status efm
You will see in the cluster status output similar to like below:
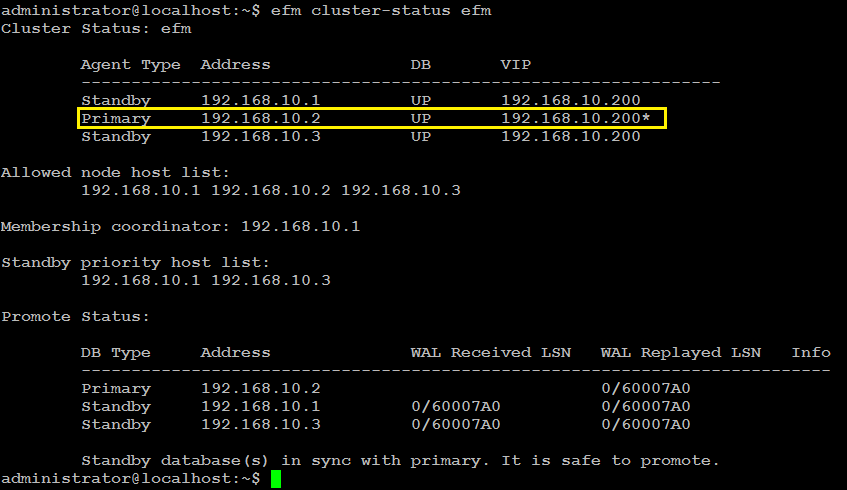
As you can see, one of the standby node (edb_postgres2) in our case, is now promoted to primary, and VIP is also belongs to it. Primary node is reconfigured, and demoted to standby node automatically.
Install PgBouncer
Type following command to install pgbouncer on Ubuntu:
sudo apt -y install pgbouncer
Configure PgBouncer Authentication
PgBouncer uses /etc/pgbouncer/userlist.txt file to authenticate database clients. You can write database credentials in userlist.txt file manually using the information from the pg_shadow catalog table, or you can create a function in database to allow a specific user to query for the current password of the database users.
Direct access to pg_shadow requires admin rights. It’s preferable to use a non-superuser that calls a SECURITY DEFINER function instead.
Connect to the database via VIP:
psql -h 192.168.10.200 -p 5444 -U enterprisedb -d edbCreate a pgbouncer role in your database:
CREATE ROLE pgbouncer LOGIN;

\password pgbouncer
Create SECURITY DEFINER function as described below:
CREATE FUNCTION public.lookup (
	INOUT p_user     name,
	OUT   p_password text
) RETURNS record
LANGUAGE sql SECURITY DEFINER SET search_path = pg_catalog AS
$$SELECT usename, passwd FROM pg_shadow WHERE usename = p_user$$;
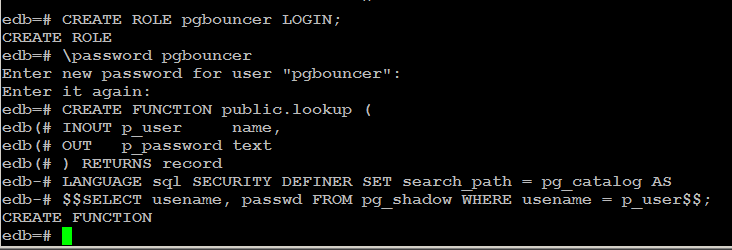
Copy encrypted password of pgbouncer from pg_shadow catalog table:
select * from pg_shadow;
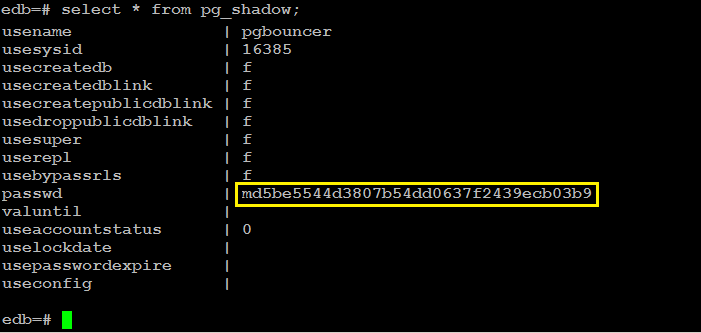
Type \q to exit from edb=# prompt:
\q
Edit /etc/pgbouncer/userlist.txt file:
sudo nano /etc/pgbouncer/userlist.txt
Add pgbouncer credential like below:
"pgbouncer" "Type_Encrypted_Password_Here"
Save and close the editor when you are finished.
Edit /etc/pgbouncer/pgbouncer.ini file, to make the required changes:
sudo nano /etc/pgbouncer/pgbouncer.iniAdd your database in [databases] section like below:
and change listen_addr=localhost to listen_addr=** = host=edb_postgres1 port=5444 dbname=edb
listen_addr = *In the [pgbouncer] section, add following, but below to auth_file = /etc/pgbouncer/userlist.txt line:
auth_user = pgbouncer
auth_query = SELECT p_user, p_password FROM public.lookup($1)
Save and close the editor when you are finished.
Restart pgbouncer to make the changes effect:
sudo systemctl restart pgbouncer.service
Make the required configuration in userlist.txt, and pgbouncer.ini file on your remaining nodes before proceeding to next.
Verify PgBouncer Authentication
Connect to database via pgbouncer port 6432 to test pgbouncer authentication:
psql -h 192.168.10.200 -p 6432 -U enterprisedb -d edb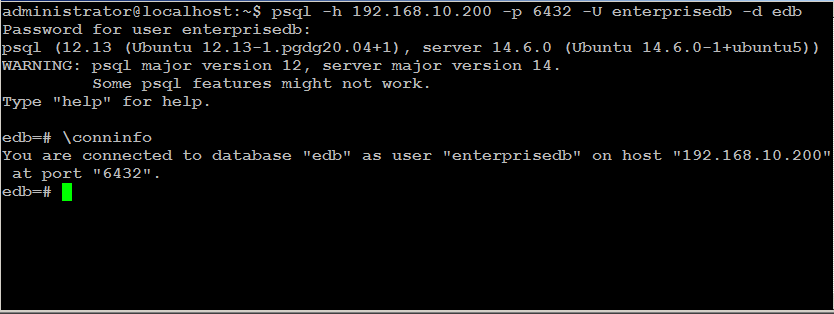
Connection to database using pgbouncer was successful as you can see in the screenshot above.
Verify Database Replication
We will create a dummy database to test replication across the nodes in the cluster:
psql -h 192.168.10.200 -p 6432 -U enterprisedb -d edbCreate a dummy database like below:
create database testDB;
create user testuser with encrypted password 'password';
grant all privileges on database testDB to testuser;

\q
Connect to testDB from each node:
psql -h edb_postgres1 -p 6432 -U testuser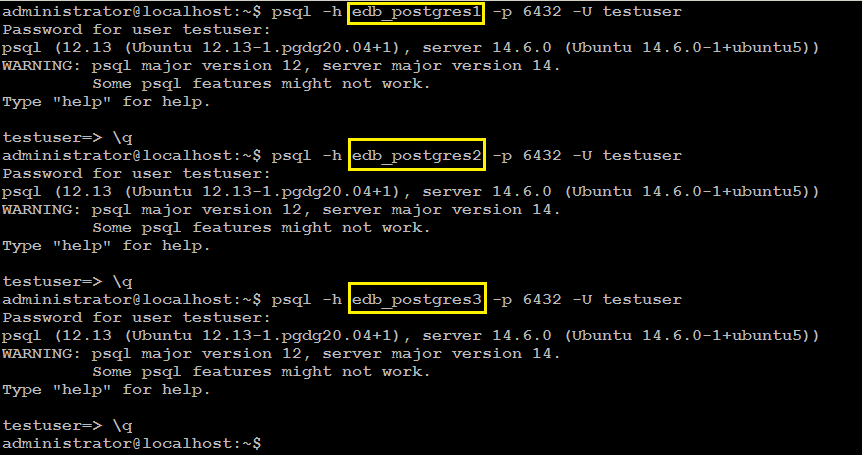
Connection to testDB was successful from each node as you can see in the screenshot above. This is to confirm that database replication is working as intended.


No comments: