This guide will walk you through the steps to set up authentication, authorization and Single sign-on in Apache web server with Azure Active Directory as an identity provider on an Ubuntu 22.04. These instructions can also be applied if you are running an earlier release of Ubuntu 18.04 or 20.04.
- ModAuthMellon is an authentication module
for Apache. It authenticates the user against a SAML 2.0 IdP, and grants
access to resources depending on attributes received from the identity
provider (IdP).
- Apache is the most widely-used web server in the world. It provides many powerful features including dynamically loadable modules, robust media support, and extensive integration with other popular software.
- Azure Active Directory (AzureAD) is Microsoft's enterprise cloud-based identity and access management (IAM) solution. It can sync with on-premise Active Directory and provide authentication to other cloud-based systems, and applications via authentication protocols like OAuth2, SAML, and WS-Security.
- Single sign-on (SSO) is a property of access control of
multiple related, yet independent, software systems. With this property,
a user logs in with a single ID and password to gain access to a
connected system or systems without using different usernames or
passwords, or in some configurations seamlessly sign on at each system.
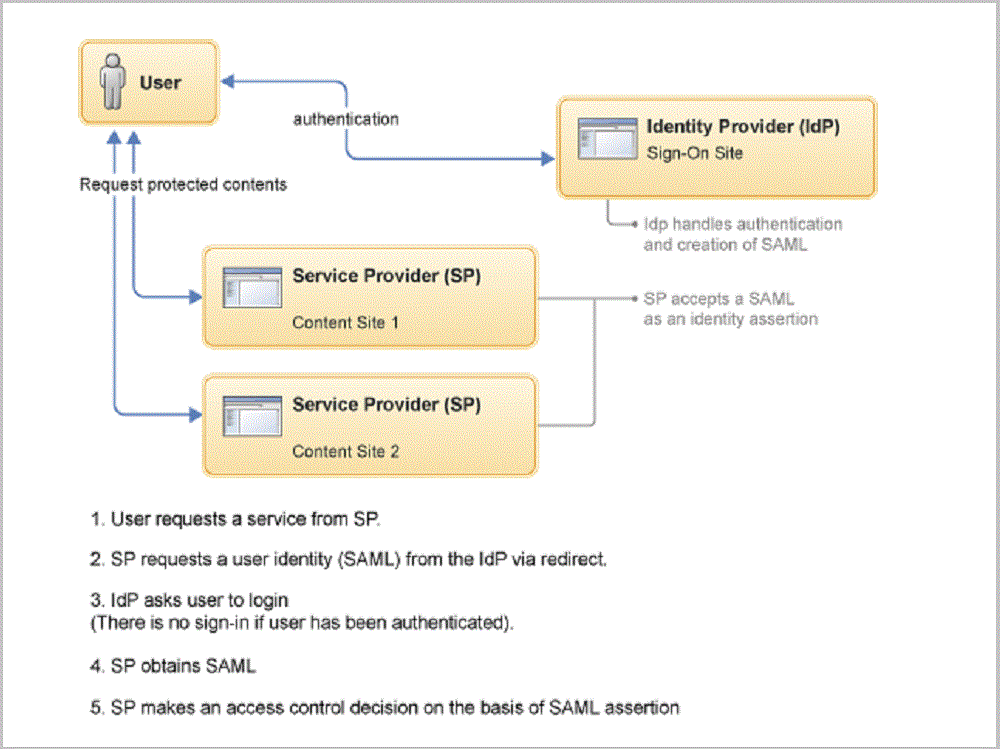
Security Assertion Markup Language (SAML 2.0) enables web applications to delegate user authentication to a SAML identity provider. For this guide, we will use Azure Active Directory (AzureAD) as a SAML Identity Provider.
To follow this tutorial along, you will need a (physical or virtual) machine installed with Ubuntu 22.04.
Install Prerequisites
Log in to your Ubuntu 22.04 using a non-root user with sudo privileges, and perform the following steps.
Type following command on your Ubuntu to set correct timezone:
Make sure you replace highlighted text with yours.
Type following command on your Ubuntu to install Apache, ModAuthMellon and their required dependencies:
Configure ModAuthMellon
In SAML, identity providers are referred to by the acronym IdP. Application using an IdP is called a service provider, usually referred to by the acronym SP.
It is recommended to keep all the configuration files related to ModAuthMellon in one location. For that, we will create a new directory mellon located under the Apache configuration root directory /etc/apache2.
Create a few helper shell variables to be used with mellon metadata creation tool:
Make sure you replace the highlighted text with yours.
Execute the Mellon metadata creation script:
If the "mellon_create_metadata" fails to generate the XML metadata file, you should edit it and comment out the "set -e" line:
Comment out the set -e line:
Save and close the editor when you are finished.
Execute the "mellon_create_metadata" script again as described above to generate XML metadata file.
Configuration for Apache add-on modules are located in the directory /etc/apache2/conf-available with file name extension of .conf. We will create a mellon.conf file in /etc/apache2/conf-available directory and place Mellon's configuration directives in it:
Create Self-signed SSL Certificate
Add following directives:
Make sure you replace the highlighted text with yours. Save and close the editor when you are finished.
Execute following command to generate self-signed SSL certificate:
Create Apache VirtualHost
We will create myapp.conf file in /etc/apache2/sites-available/ directory to declear https://myapp.stepstoperform.com/ url and to host protected contents in /var/www/html/private directory.
Add following configuration directives:
Make sure you replace the highlighted text with yours. Save and close the editor when you are finished.
Create a private directory under /var/www/html to host your web contents:
We do not have any application to host but for demonstration purpose, we will create a simple index page in /var/www/html/private location:
Add simple html code in your index.html page:
Save and close the editor when you are finished.
Type following command to verify Apache configuration:
If everything configured correctly as described, you will see Syntax OK in the output. If there is any error in the configuration file, fix them first and then test the apache configuration again.
Type following command to activate your Apache configuration:
Do not start or restart Apache at this stage as we still need to perform few more steps on Azure AD to obtain idp metadata file.
Configure SAML Authentication on AzureAD
First obtain mellon_metadata.xml file from your Ubuntu machine located under /etc/apache2/mellon directory as you need it to upload to your AzureAD.
Log in to your Azure portal and perform the following steps to configure SAML authentication for your browser based application.
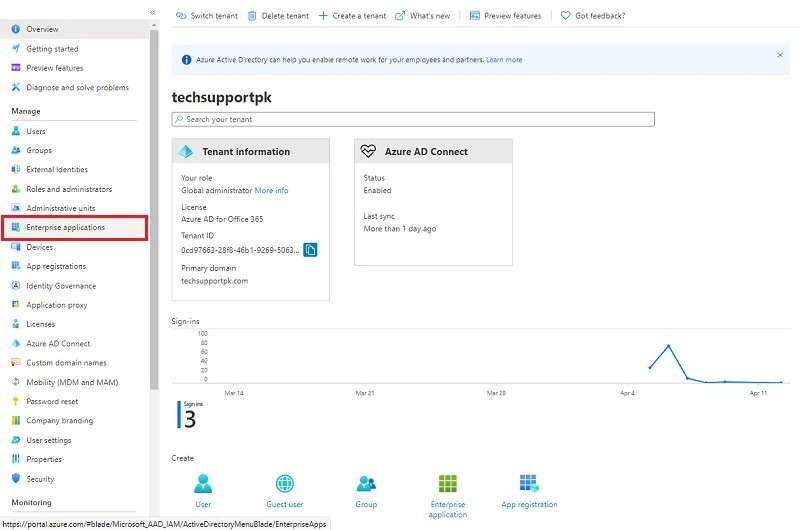
Navigate to Azure Active Directory > Enterprise application
Click New application

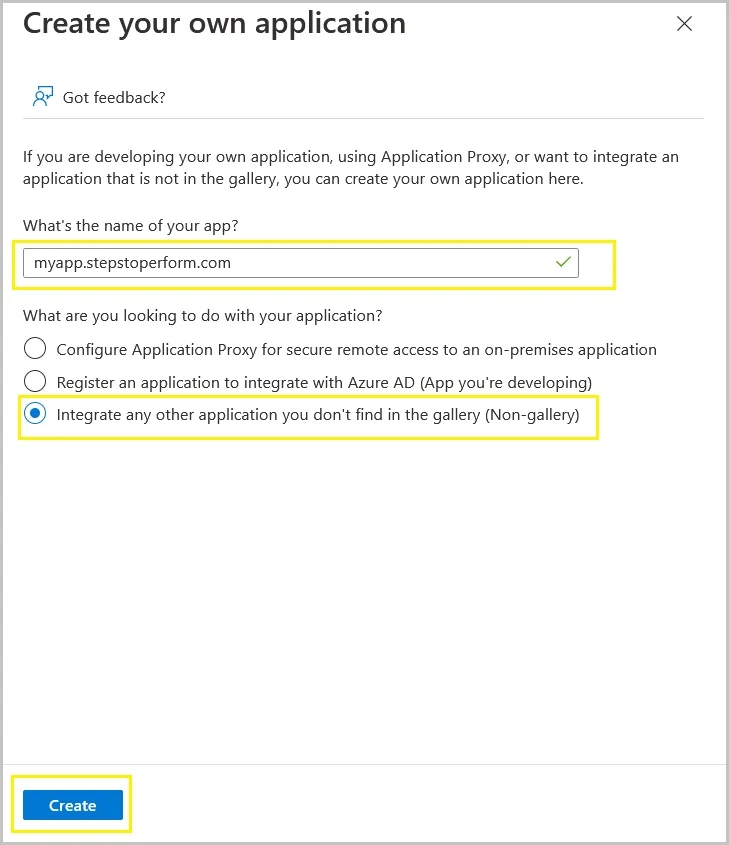
Click Create your own application

Enter your application URL (myapp.stepstoperform.com) for example, in the name box.
Select Integrate any other application you don’t find in the gallery (Non-gallery) from the option.
Click Create
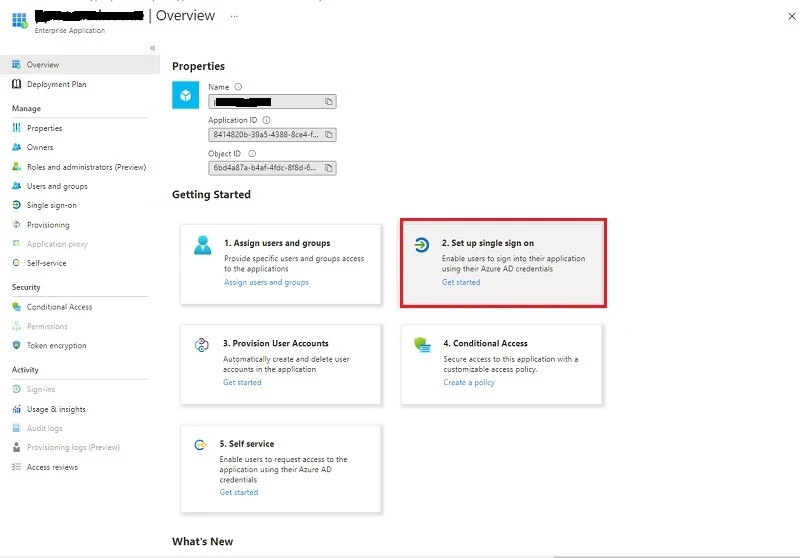
Click on Set up single sign on
Click on SAML
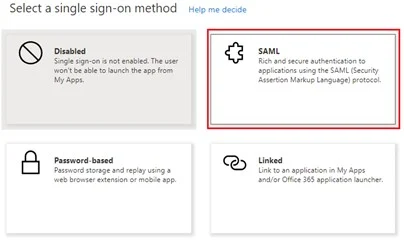
Click on Upload metadata file

Click Browse icon.

Select your mellon_metadata.xml file you obtained from your Ubuntu.
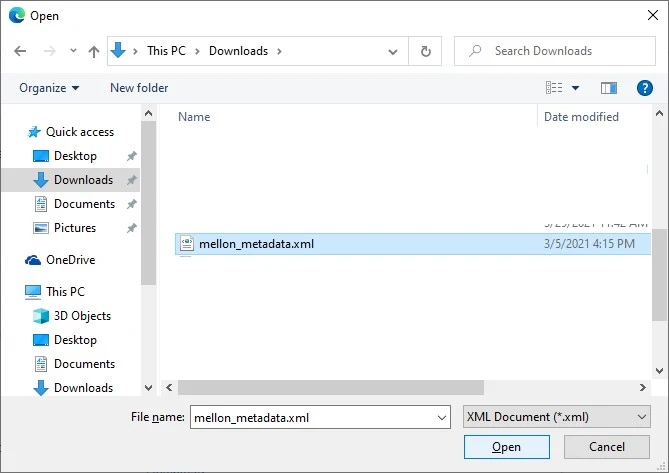
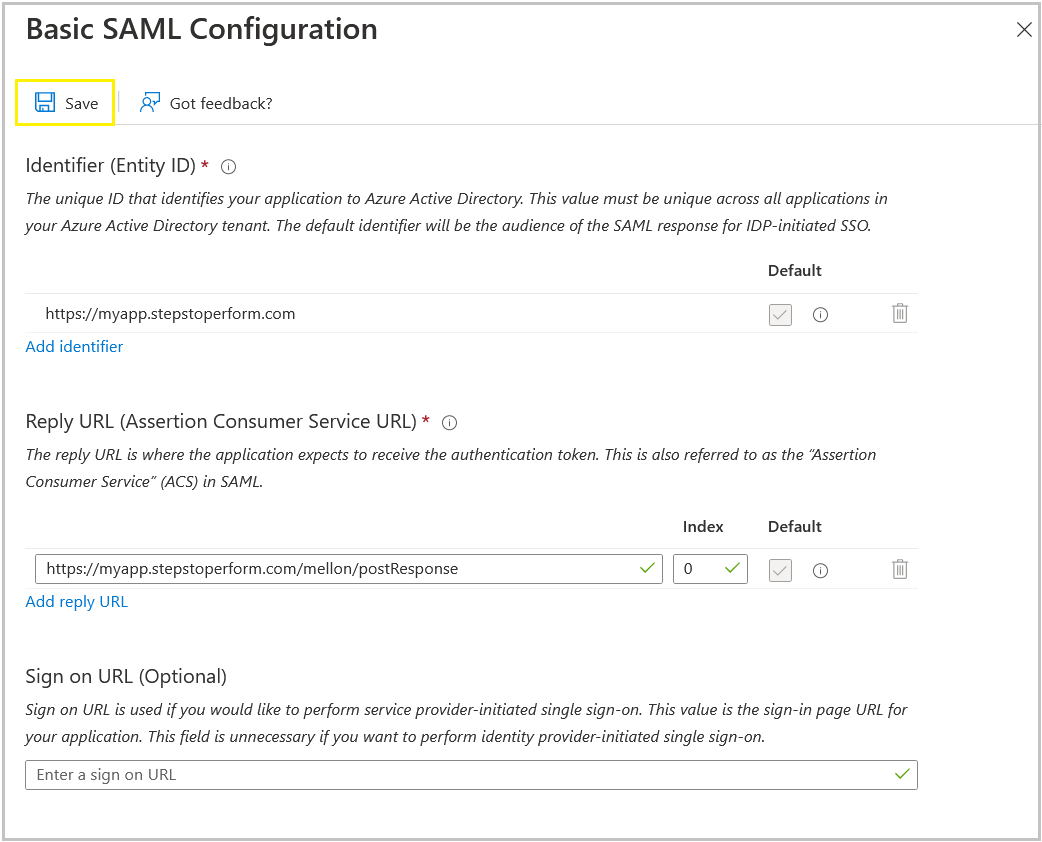
Click on Add

Click Save, then Click X sign to close Basic SAML Configuration screen.
Click on No. I’ll test later

Scroll down to download Federation Metadata XML file from the SAML Signing Certificate section.

Save this federation metadata file and rename it as idp_metadata.xml.
Next, navigate to Properties

Change User assignment required from Yes to No
Click Save
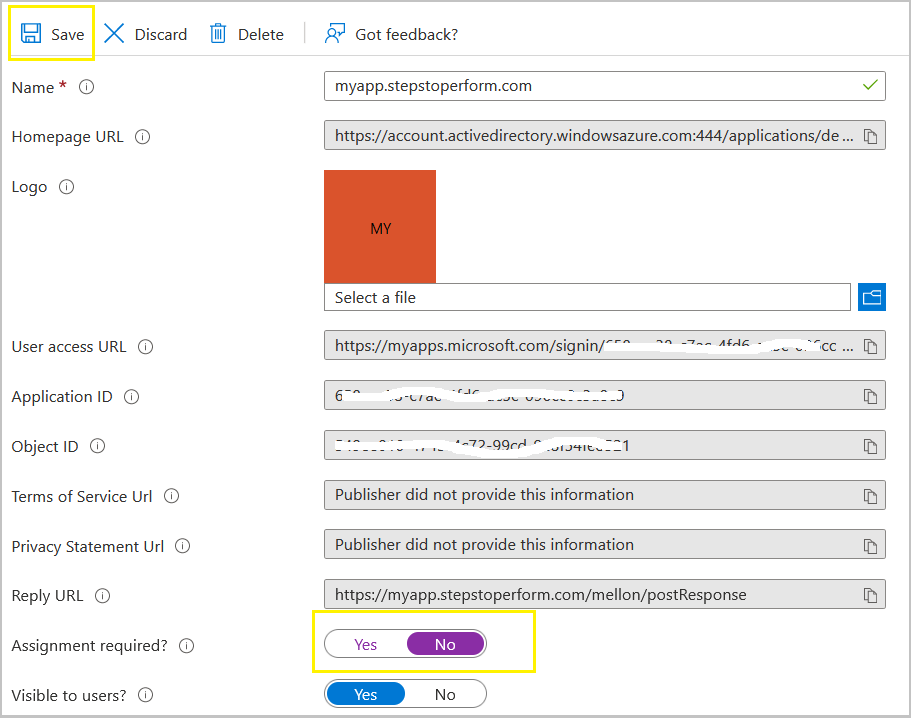
At this stage, your Azure Active Directory is ready to serve SAML authentication to your browser based application. You need to transfer idp_metadata.xml file to your Ubuntu in /etc/apache2/mellon directory.
Log in to your Ubuntu, and restart Apache to make the changes effect:
Test Apache and AzureAD SAML Authentication
From a web browser, enter https://myapp.stepstoperform.com/private url in the address bar.

This will take you to your Azure Active Directory authentication page where you need to enter your credentials to log in.
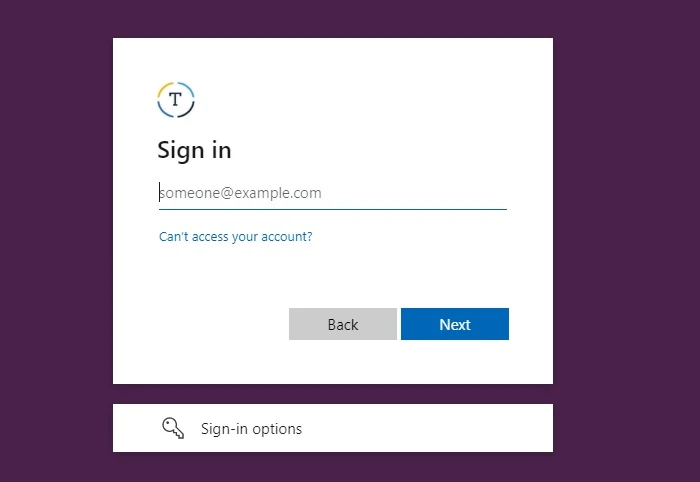
When you are logged in using your Azure Active Directory credentials, you will be redirected to your simple index.html page as shown in screenshot below:

You can verify logged in user from Apache logs using tail -f /var/log/apache2/access.log command.

As you can see in Apache logs that we are logged in using webappuser1@techsupportpk.com and that is our Azure Active Directory user.
At this stage, you have successfully implemented Authentication, authorization, and Single sign-on in your Apache using ModAuthMellon as SAML service provider and Azure Active Directory as an SAML identity provider.
Conclusion
I hope this guide was helpful to integrate Azure Active Directory authentication in Apache on your Ubuntu 22.04. We highly appreciate if you leave few words of your thoughts about this tutorial in the comment section below.


Hi everyone,
ReplyDeletethank you for this amazing tutorial!
My question: when I execute /usr/sbin/mellon_create_metadata $mellon_entity_id $mellon_endpoint_url - only the .key and the .cert file are created. The xm. file is missing. Regarding your tutorial I would need the file in the further config.
Any idea?
Thank you!
This seems a bug in Ubuntu 22.04, and I didn’t find any workaround as yet. What you can do is to manually create metadata.xml file adding .cert inside it. I am going to update tutorial with this step shortly.
DeleteThanks a lot! I set up a Ubuntu 20.04 and created the data there what worked fine.
DeleteIf the "mellon_create_metadata" fails to generate the XML metadata file, you should edit it:
Deletesudo nano /usr/sbin/mellon_create_metadata
and comment out the "set -e" line.
Save and close the editor, and rerun to generate XML metadata file.
Amazing tutorial. I searched the whole web trying to find good documentation and your instructions are the BEST and very informative and easy to follow... Thank you so much.
ReplyDeleteHappy to help.
DeleteHello,
ReplyDeleteI have a question, In our company we have a website that needs to be authenticated using SSO.
I have followed your instructions and have created SP metadata and have obtained the IDP metadata.
You instructions are only if you dont have any application hosted. Since we are already hosting an application what would be the instructions to Setup SSO?
Do we still need to create self-signed SSL certificate? How will the Apache virtual host looklike (do we need it or not)? Can you please give instructions on that.
Thank you so much... your instructions are very helpful.
This tutorial is compatible with any kind of application you are hosting as long as Apache is being used as your web server. You do not need to create self-signed SSL, and you can use your own digital SSL certificate.
DeleteFollowing is an example of how you can configure Apache VirtualHost enabling SSO for your application:
<VirtualHost *:443>
ServerName example.com
DocumentRoot /your_app_serving_directory
ErrorLog /var/log/apache2/ssl_example_error.log
CustomLog /var/log/apache2/ssl_example_access.log combined
LogLevel info ssl:warn
SSLCertificateFile /etc/apache2/your_ssl_cert.crt
SSLCertificateKeyFile /etc/apache2/your_ssl_cert.key
</VirtualHost>
<Location /your_app_serving_directory>
AuthType "Mellon"
MellonEnable "auth"
Require valid-user
MellonUser "http://schemas.xmlsoap.org/ws/2005/05/identity/claims/name"
</Location>
It is up to your requirement whether you want to enable SSO for entire website, or for just a single page, directory or sub-directory of your app.
Thank you Tech Support, another question. In our setup, we have website that runs on nginx web server. we want to set up Apache acting as a reverse proxy in front of the application server so that the Shibboleth Native SP for Apache can be deployed and used to manage the SAML interactions. Which files do we need to update on the apache side to configure this properly. Thank you.
ReplyDeleteMake sure you have Shibboleth properly installed and configured on your Apache server. Following is just an example, adjust Shibboleth settings based on your requirements.
DeleteEdit your VirtualHost file to add or modify required directives:
<VirtualHost *:443>
ServerName your.domain.com
SSLEngine On
SSLCertificateFile /path/to/your/certificate.crt
SSLCertificateKeyFile /path/to/your/private.key
ProxyPass / http://your.application.server:application_port/
ProxyPassReverse / http://your.application.server:application_port/
# Shibboleth settings
<Location />
AuthType shibboleth
ShibRequestSetting requireSession 1
require valid-user
</Location>
ProxyRequests Off
<Proxy *>
Order deny,allow
Allow from all
</Proxy>
</VirtualHost>
After making these changes, restart Apache to apply the configuration.
sudo systemctl restart apache2
Great article with detailed steps. I'm trying to host multiple website on a single server and proxy through apache. However its not working when i'm adding Location tag with name and having proxy details inside.
ReplyDeleteServerName your.domain.com
SSLEngine On
SSLCertificateFile /path/to/your/certificate.crt
SSLCertificateKeyFile /path/to/your/private.key
AuthType Mellon
MellonEnable auth
Require valid-user
ProxyPass http://your.application.server:8080/
ProxyPassReverse http://your.application.server:8080/
AuthType Mellon
MellonEnable auth
Require valid-user
ProxyPass http://your.application.server:5050/
ProxyPassReverse http://your.application.server:5050/
ProxyRequests Off
Order deny,allow
Allow from all
You are doing it wrong. Your VirtualHost configuration should be in one tag, and your authentication should be in second tag of Location like:
Delete<VirtualHost:443>
ServerName your.domain.com
SSLEngine On
SSLCertificateFile /path/to/your/certificate.crt
SSLCertificateKeyFile /path/to/your/private.key
ProxyPass http://your.application.server:8080/
ProxyPassReverse http://your.application.server:8080/
ProxyPass http://your.application.server:5050/
ProxyPassReverse http://your.application.server:5050/
ProxyRequests Off
Order deny,allow
Allow from all
</VirtualHost>
<Location /your-content-directory>
AuthType Mellon
MellonEnable auth
Require valid-user
</Location>
How will I differentiate between Jenkins(port 8080) and abc(port 5050)? How will https://your.application.server/jenkins will redirect to http://your.application.server:8080/? Where should I define the naming convention? I dont have any content hosted locally then what directory it should point to ?
DeleteIn such case you should point to entire url in Location tag like:
Delete<Location />
AuthType Mellon
MellonEnable auth
Require valid-user
</Location>
Hi, Thanks for the great detailed article. This is the base for us to setup Apache proxy on our side. I followed the same steps, I'm able tp proxy to the required website on Firefox, but on other browsers(Chrome & Microsoft Edge) returns bad request.
ReplyDeleteCheck Apache logs, use SAMLtracer extension on (Chrome/Edge) browser to find out root cause of bad request of your website.
DeleteWhen I try and access [/private] I keep getting:
ReplyDeleteUnauthorized
This server could not verify that you are authorized to access the document requested. Either you supplied the wrong credentials (e.g., bad password), or your browser doesn't understand how to supply the credentials required.
Check Apache logs to find out the root cause of the issue. Make sure your Linux server's time, and date is correctly defined.
Delete