This guide will walk you through the steps to set up a fault-tolerant, scalable and highly available patroni cluster with PostgreSQL database release 12 on Ubuntu 22.04.
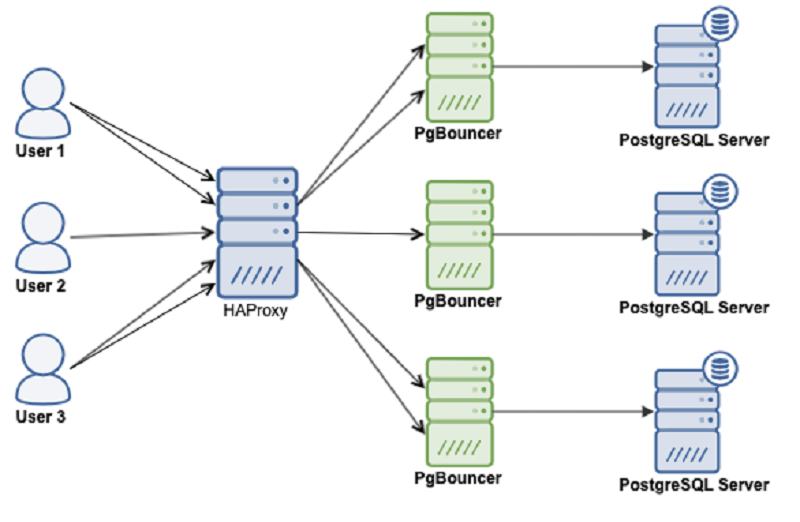
Patroni high availability cluster is comprised of the following components:
- PostgreSQL database is a powerful, open source object-relational database system with over 35 years of active development that has earned it a strong reputation for reliability, feature robustness, and performance.
- Patroni is a cluster manager used to customize and automate deployment and maintenance of PostgreSQL HA (High Availability) clusters.
- PgBouncer is an open-source, lightweight, single-binary connection pooler for PostgreSQL. PgBouncer maintains a pool of connections for each unique user, database pair. It’s typically configured to hand out one of these connections to a new incoming client connection, and return it back in to the pool when the client disconnects.
- etcd is a strongly consistent, distributed key-value store that provides a reliable way to store data that needs to be accessed by a distributed system or cluster of machines. We will use etcd to store the state of the PostgreSQL cluster.
- HAProxy is a free and open source software that provides a high availability load balancer and reverse proxy for TCP and HTTP-based applications that spreads requests across multiple servers.
- Keepalived implements a set of health checkers to dynamically and adaptively maintain and manage load balanced server pools according to their health. When designing load balanced topologies, it is important to account for the availability of the load balancer itself as well as the real servers behind it.
All of these patroni cluster components need to be installed on Linux servers. Patroni software shares the server with the PostgreSQL database.
Patroni Cluster Hardware Requirements
The following sections will help you to understand the least minimum system requirements for the various components of the patroni cluster.
Patroni/Postgres system requirements:
2 Core CPU
4 GB RAM
80 GB HDD
For extensive usage, it is recommended to assign 100 GB to PGDATA directory, or even more disk space according to your data retention policy.
ETCD system requirements:
2 Core CPU
4 GB RAM
80 GB SSD
It is highly recommended to use dedicated SSD storage because etcd is iops heavy, and writes data to disk, strongly depends on disk performance.
PgBouncer system requirements:
2 Core CPU
4 GB RAM
20 GB HDD
PgBouncer is just a connection pooler for postgres database, and it doesn't require much disk space.
HAProxy system requirements:2 Core CPU
4 GB RAM
80 GB HDD
The above HAProxy system requirements is given based on an average of 1000 connections per second. For a larger number of connections, the memory and CPU have to be increased in the ratio of 1:2 (memory in GB = 2 x number of CPU cores). The CPU cores have to be as fast as possible for better HAProxy performance.
Number of nodes requirements for patroni cluster
It is recommended to have an odd number of nodes in a patroni cluster. An odd-size cluster tolerates the same number of failures as an even-size cluster but with fewer nodes. The difference can be seen by comparing even and odd sized clusters:
The same odd number of nodes recommendation goes for etcd cluster as
well. Safely, you can say 3-nodes cluster is better, but 5-nodes cluster
is good to go.
Production environment for patroni cluster
You can take an example of the following recommended set up to build a highly available patroni cluster for your production use.
Solution 1:
- Take 3-nodes for patroni cluster - install (postgres, patroni, pgbouncer, haproxy, keepalived) on these three machines.
- Take 3-nodes for etcd cluster - install etcd on these three machines.
This will become a 6-nodes patroni cluster, which you can scale up in future by adding more nodes into your patroni and etcd cluster to meet your production needs.
Solution 2:
- Take 3-nodes for patroni cluster - install (patroni+postgres) on these three machines.
- Take 3-nodes for etcd cluster - install only (etcd) on these three machines.
- Take 2-nodes for HAProxy - install (haproxy+keepalived+pgbouncer)on these two machines.
This will become a 8-nodes patroni cluster which you can scale up in future by adding more nodes into your patroni and etcd cluster to meet your production needs.
Basic environment for patroni cluster
For the demonstration purpose, we will start with the basic environment to set up a 3-node patroni cluster on three separate virtual machines:
We will install all the patroni cluster components on these three virtual machines.
Prepare Your Ubuntu for Patroni Cluster
sudo timedatectl set-timezone Asia/Karachi
sudo hostnamectl set-hostname patroni1sudo nano /etc/hosts192.168.10.1 patroni1Save and close the editor when you are finished.
192.168.10.2 patroni2
192.168.10.3 patroni3
Make sure you have performed all of the above steps on each Ubuntu server before proceeding to next.
Configure UFW Firewall
- 5432 PostgreSQL database standard port.
- 6432 PgBouncer standard port.
- 8008 patroni rest api port required by HAProxy to check the nodes status.
- 2379 etcd client port required by any client including patroni to communicate with etcd.
- 2380 etcd peer urls port required by the etcd members communication.
- 5000 HAProxy front-end listening port for back-end master database server.
- 5001 HAProxy front-end listening port for back-end replica database servers.
- 7000 HAProxy HTTP port to access stats dashboard.
You can allow required ports from your Ubuntu UFW firewall using the following command:
sudo ufw allow 5432/tcpsudo ufw allow 6432/tcpsudo ufw allow 8008/tcp
sudo ufw allow 2379/tcp
sudo ufw allow 2380/tcp
sudo ufw allow http
sudo ufw allow 5000/tcpsudo ufw allow 5001/tcpsudo ufw allow 7000/tcp
sudo ufw allow from 224.0.0.18 comment "keepalived"
sudo ufw allow to 224.0.0.18 comment "keepalived"
sudo ufw reload
Add PostgreSQL APT Repository
sudo apt -y install wget ca-certificates

sudo wget --quiet -O - https://www.postgresql.org/media/keys/ACCC4CF8.asc | sudo apt-key add -

sudo sh -c 'echo "deb http://apt.postgresql.org/pub/repos/apt/ $(lsb_release -cs)-pgdg main" >> /etc/apt/sources.list.d/pgdg.list'

sudo apt update
Install PostgreSQL
sudo apt -y install postgresql-12

sudo systemctl stop postgresql

sudo systemctl disable postgresql

sudo ln -s /usr/lib/postgresql/12/bin/* /usr/sbin/

sudo su postgres

rm -rf /var/lib/postgresql/12/main/*

exit
Install etcd
sudo apt -y install etcd

sudo systemctl stop etcd

sudo systemctl disable etcd

sudo rm -rf /var/lib/etcd/default
Configure etcd Cluster
sudo mv /etc/default/etcd /etc/default/etcd-orig

sudo nano /etc/default/etcd
ETCD_NAME=patroni1
ETCD_DATA_DIR="/var/lib/etcd/patroni1"
ETCD_LISTEN_PEER_URLS="http://192.168.10.1:2380"
ETCD_LISTEN_CLIENT_URLS="http://192.168.10.1:2379"
ETCD_INITIAL_ADVERTISE_PEER_URLS="http://192.168.10.1:2380"
ETCD_INITIAL_CLUSTER="patroni1=http://192.168.10.1:2380,patroni2=http://192.168.10.2:2380,patroni3=http://192.168.10.3:2380"
ETCD_INITIAL_CLUSTER_STATE="new"
ETCD_INITIAL_CLUSTER_TOKEN="etcd-cluster"
ETCD_ADVERTISE_CLIENT_URLS="http://192.168.10.1:2379"
ETCD_ENABLE_V2="true"
sudo mv /etc/default/etcd /etc/default/etcd-orig

sudo nano /etc/default/etcd
ETCD_NAME=patroni2ETCD_DATA_DIR="/var/lib/etcd/patroni2"ETCD_LISTEN_PEER_URLS="http://192.168.10.2:2380"
ETCD_LISTEN_CLIENT_URLS="http://192.168.10.2:2379"
ETCD_INITIAL_ADVERTISE_PEER_URLS="http://192.168.10.2:2380"
ETCD_INITIAL_CLUSTER="patroni1=http://192.168.10.1:2380,patroni2=http://192.168.10.2:2380,patroni3=http://192.168.10.3:2380"
ETCD_INITIAL_CLUSTER_STATE="new"
ETCD_INITIAL_CLUSTER_TOKEN="etcd-cluster"
ETCD_ADVERTISE_CLIENT_URLS="http://192.168.10.2:2379"ETCD_ENABLE_V2="true"
sudo mv /etc/default/etcd /etc/default/etcd-orig

sudo nano /etc/default/etcd
ETCD_NAME=patroni3ETCD_DATA_DIR="/var/lib/etcd/patroni3"ETCD_LISTEN_PEER_URLS="http://192.168.10.3:2380"
ETCD_LISTEN_CLIENT_URLS="http://192.168.10.3:2379"
ETCD_INITIAL_ADVERTISE_PEER_URLS="http://192.168.10.3:2380"
ETCD_INITIAL_CLUSTER="patroni1=http://192.168.10.1:2380,patroni2=http://192.168.10.2:2380,patroni3=http://192.168.10.3:2380"
ETCD_INITIAL_CLUSTER_STATE="new"
ETCD_INITIAL_CLUSTER_TOKEN="etcd-cluster"
ETCD_ADVERTISE_CLIENT_URLS="http://192.168.10.3:2379"ETCD_ENABLE_V2="true"
cd ~
nano .profile
export PGDATA="/var/lib/postgresql/12/data"
export ETCDCTL_API="3"
export PATRONI_ETCD_URL="http://127.0.0.1:2379"
export PATRONI_SCOPE="pg_cluster"
patroni1=192.168.10.1
patroni2=192.168.10.2
patroni3=192.168.10.3
ENDPOINTS=$patroni1:2379,$patroni2:2379,$patroni3:2379
sudo systemctl start etcd
sudo systemctl status etcdsource ~/.profile
etcdctl endpoint status --write-out=table --endpoints=$ENDPOINTS

Install Patroni
sudo apt -y install python3 python3-pip python3-dev libpq-dev
sudo pip3 install launchpadlib--upgrade setuptoolspsycopg2
sudo apt -y installpython3-etcdpatroni
sudo systemctl stop patroni
sudo systemctl disable patroni
Configure Patroni Cluster
By default Patroni configures PostgreSQL database for asynchronous replication using PostgreSQL streaming replication method. Choosing your replication schema is dependent on your production environment.
Synchronous vs Asynchronous replication:PostgreSQL supports both synchronous and asynchronous replication for high availability and disaster recovery.
- Synchronous replication means that a write operation is only considered complete once it has been confirmed as written to the master server as well as one or more synchronous standby servers. This provides the highest level of data durability and consistency, as clients are guaranteed that their writes have been replicated to at least one other server before the write is acknowledged as successful. However, the tradeoff is that the performance of the master server is impacted by the time it takes to confirm the write to the synchronous standby servers, which can be a bottleneck in high-write environments.
- Asynchronous replication, on the other hand, means that a write operation is acknowledged as successful as soon as it is written to the master server, without waiting for any confirmations from standby servers. This provides better performance as the master server is not blocked by the replication process, but the tradeoff is that there is a risk of data loss if the master server fails before the write is replicated to the standby servers.
For more information about async, and sync replications, see the Postgres documentation as well as Patroni documentation to determine which replication solution is best for your production need.
For this guide, we will use default asynchronous replication mode.
Create a configuration file for Patroni on your first node (patroni1), in our case:
sudo nano /etc/patroni/config.yml
scope: pg_cluster
namespace: /service/
name: patroni1

restapi:
    listen: 192.168.10.1:8008
    connect_address: 192.168.10.1:8008

etcd:
    hosts: 192.168.10.1:2379,192.168.10.2:2379,192.168.10.3:2379

bootstrap:
  dcs:
    ttl: 30
    loop_wait: 10
    retry_timeout: 10
    maximum_lag_on_failover: 1048576
    postgresql:
      use_pg_rewind: true
      use_slots: true
      parameters:

  initdb:
  - encoding: UTF8
  - data-checksums

  pg_hba:
  - host replication replicator 127.0.0.1/32 md5
  - host replication replicator 192.168.10.1/32 md5
  - host replication replicator 192.168.10.2/32 md5
  - host replication replicator 192.168.10.3/32 md5
  - host all all 0.0.0.0/0 md5

  users:
    admin:
      password: admin
      options:
        - createrole
        - createdb

postgresql:
  listen: 192.168.10.1:5432
  connect_address: 192.168.10.1:5432
  data_dir: /var/lib/postgresql/12/main
  bin_dir: /usr/lib/postgresql/12/bin
  pgpass: /tmp/pgpass
  authentication:
    replication:
      username: replicator
      password: replicator
    superuser:
      username: postgres
      password: postgres

tags:
    nofailover: false
    noloadbalance: false
    clonefrom: false
    nosync: false
Make sure, you change namespace, listen and connect_address values to reflect yours. Save and close the editor when you are finished.scope: pg_cluster
namespace: /service/
name: patroni2
restapi:
listen: 192.168.10.2:8008
connect_address: 192.168.10.2:8008
etcd:
hosts: 192.168.10.1:2379,192.168.10.2:2379,192.168.10.3:2379
bootstrap:
dcs:
ttl: 30
loop_wait: 10
retry_timeout: 10
maximum_lag_on_failover: 1048576
postgresql:
use_pg_rewind: true
use_slots: true
parameters:
initdb:
- encoding: UTF8
- data-checksums
pg_hba:
- host replication replicator 127.0.0.1/32 md5- host replication replicator 192.168.10.1/32 md5
- host replication replicator 192.168.10.2/32 md5
- host replication replicator 192.168.10.3/32 md5- host all all 0.0.0.0/0 md5
users:
admin:
password: admin
options:
- createrole
- createdb
postgresql:
listen: 192.168.10.2:5432
connect_address: 192.168.10.2:5432
data_dir: /var/lib/postgresql/12/main
bin_dir: /usr/lib/postgresql/12/bin
pgpass: /tmp/pgpass
authentication:
replication:
username: replicator
password: replicator
superuser:
username: postgres
password: postgres
tags:
nofailover: false
noloadbalance: false
clonefrom: false
nosync: false
Make sure, you change namespace, listen and connect_address values to reflect yours. Save and close the editor when you are finished.scope: pg_cluster
namespace: /service/
name: patroni3
restapi:
listen: 192.168.10.3:8008
connect_address: 192.168.10.3:8008
etcd:
hosts: 192.168.10.1:2379,192.168.10.2:2379,192.168.10.3:2379
bootstrap:
dcs:
ttl: 30
loop_wait: 10
retry_timeout: 10
maximum_lag_on_failover: 1048576
postgresql:
use_pg_rewind: true
use_slots: true
parameters:
initdb:
- encoding: UTF8
- data-checksums
pg_hba:
- host replication replicator 127.0.0.1/32 md5- host replication replicator 192.168.10.1/32 md5
- host replication replicator 192.168.10.2/32 md5
- host replication replicator 192.168.10.3/32 md5- host all all 0.0.0.0/0 md5
users:
admin:
password: admin
options:
- createrole
- createdb
postgresql:
listen: 192.168.10.3:5432
connect_address: 192.168.10.3:5432
data_dir: /var/lib/postgresql/12/main
bin_dir: /usr/lib/postgresql/12/bin
pgpass: /tmp/pgpass
authentication:
replication:
username: replicator
password: replicator
superuser:
username: postgres
password: postgres
tags:
nofailover: false
noloadbalance: false
clonefrom: false
nosync: false
Start Patroni Cluster
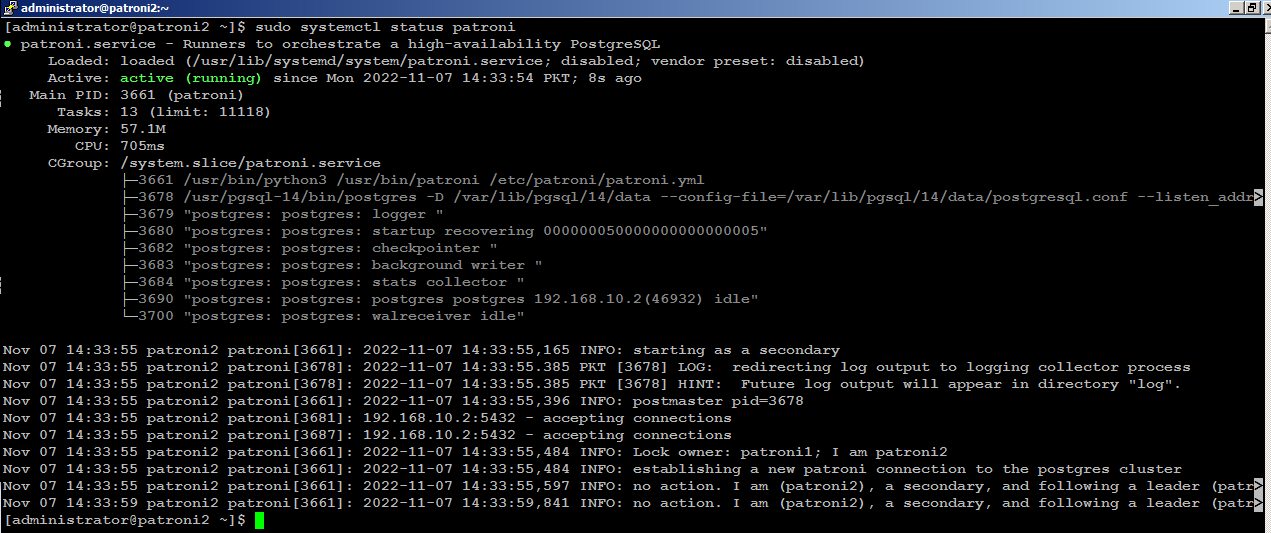
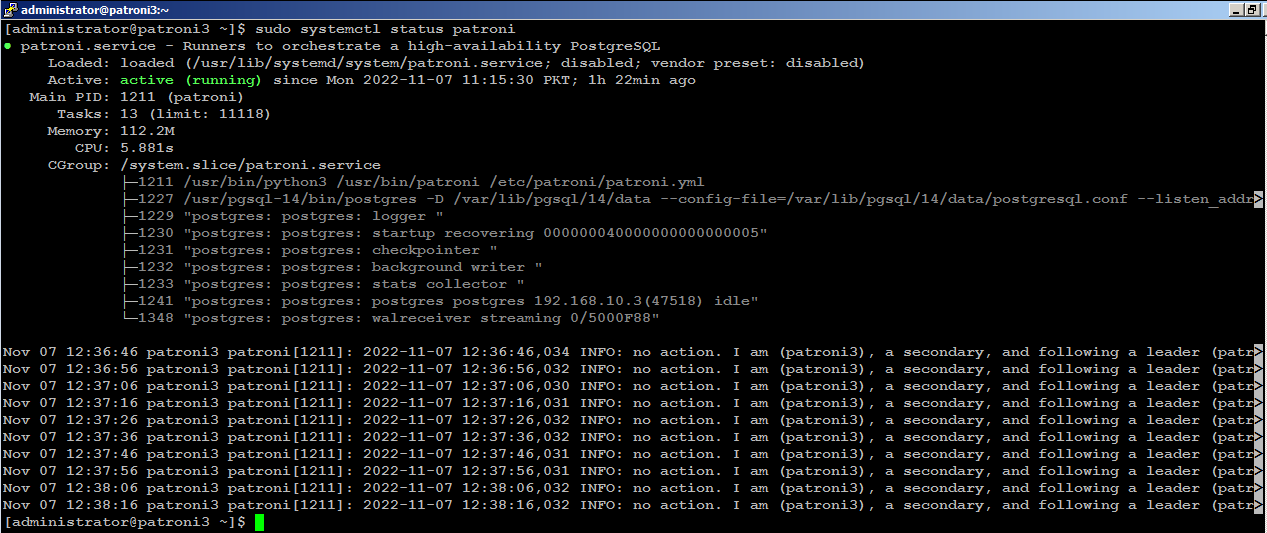
sudo systemctl start patroni
sudo systemctl status patroni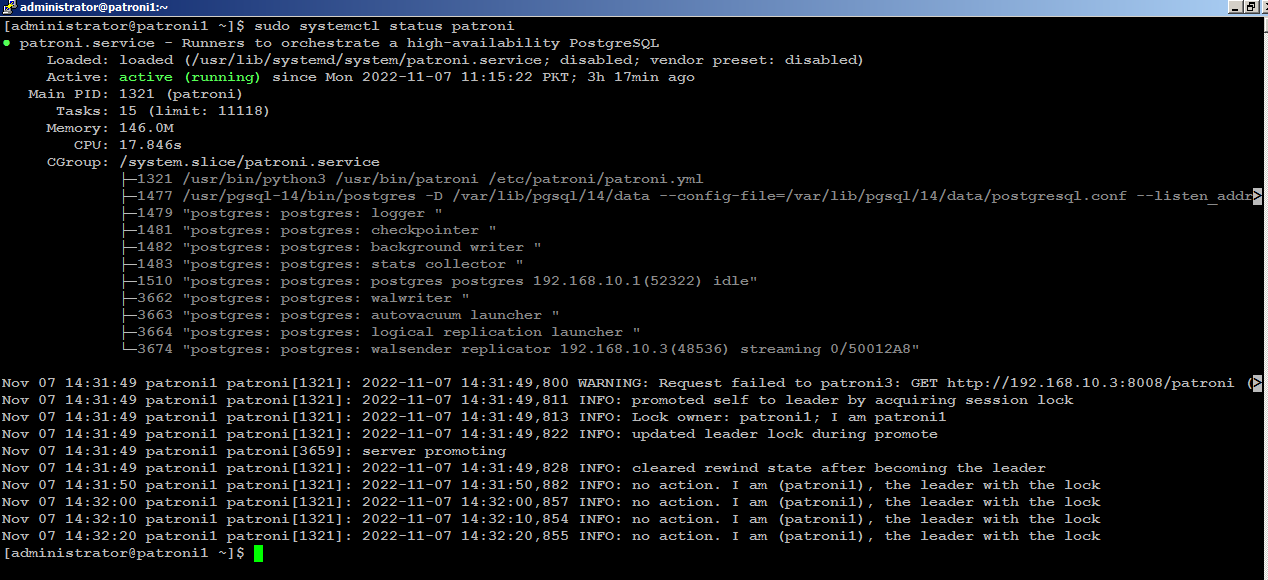
Install PgBouncer
You can install pgbouncer on your Ubuntu servers using the following command:
sudo apt -y install pgbouncer

sudo systemctl stop pgbouncer

sudo systemctl disable pgbouncer
Configure PgBouncer Authentication
PgBouncer uses /etc/pgbouncer/userlist.txt file to authenticate database clients. You can write database credentials in userlist.txt file manually using the information from the pg_shadow catalog table, or you can create a function in database to allow a specific user to query for the current password of the database users.
Direct access to pg_shadow requires admin rights. It’s preferable to use a non-superuser that calls a SECURITY DEFINER function instead.
From your (patroni1), connect to the Postgres database as superuser, and create a security definer function:
psql -h patroni1 -p 5432 -U postgres
Execute following at postgres=# prompt:
CREATE ROLE pgbouncer LOGIN with encrypted password "Type_Your_Password_Here";

CREATE FUNCTION public.lookup (
	INOUT p_user     name,
	OUT   p_password text
) RETURNS record
LANGUAGE sql SECURITY DEFINER SET search_path = pg_catalog AS
$$SELECT usename, passwd FROM pg_shadow WHERE usename = p_user$$;
Make sure you replace the highlighted text with yours.
Next, copy encrypted password of pgbouncer from pg_shadow catalog table:
select * from pg_shadow;
Type \q to exit from postgres=# prompt:
\q
Edit /etc/pgbouncer/userlist.txt file:
sudo nano /etc/pgbouncer/userlist.txt
Add pgbouncer credential like below:
"pgbouncer" "Type_Encrypted_Password_Here"
Save and close the editor when you are finished.
sudo cp -p /etc/pgbouncer/pgbouncer.ini /etc/pgbouncer/pgbouncer.ini.origAdd your database in [databases] section like below:
sudo nano /etc/pgbouncer/pgbouncer.ini
and change listen_addr=localhost to listen_addr=** = host=192.168.10.1 port=5432 dbname=postgres
listen_addr = *In the [pgbouncer] section, add following, but below to auth_file = /etc/pgbouncer/userlist.txt line:
auth_user = pgbouncer
auth_query = SELECT p_user, p_password FROM public.lookup($1)
Save and close the editor when you are finished.
From (patroni2), edit /etc/pgbouncer/userlist.txt file:
sudo nano /etc/pgbouncer/userlist.txt
Add pgbouncer credential like below:
"pgbouncer" "Type_Encrypted_Password_Here"
Save and close the editor when you are finished.
sudo cp -p /etc/pgbouncer/pgbouncer.ini /etc/pgbouncer/pgbouncer.ini.origAdd your database in [databases] section like below:
sudo nano /etc/pgbouncer/pgbouncer.ini
and change listen_addr=localhost to listen_addr=** = host=192.168.10.2 port=5432 dbname=postgres
listen_addr = *In the [pgbouncer] section, add following, but below to auth_file = /etc/pgbouncer/userlist.txt line:
auth_user = pgbouncer
auth_query = SELECT p_user, p_password FROM public.lookup($1)
Save and close the editor when you are finished.
From (patroni3), edit /etc/pgbouncer/userlist.txt file:
sudo nano /etc/pgbouncer/userlist.txt
Add pgbouncer credential like below:
"pgbouncer" "Type_Encrypted_Password_Here"
Save and close the editor when you are finished.
sudo cp -p /etc/pgbouncer/pgbouncer.ini /etc/pgbouncer/pgbouncer.ini.origAdd your database in [databases] section like below:
sudo nano /etc/pgbouncer/pgbouncer.ini
and change listen_addr=localhost to listen_addr=** = host=192.168.10.3 port=5432 dbname=postgres
listen_addr = *In the [pgbouncer] section, add following, but below to auth_file = /etc/pgbouncer/userlist.txt line:
auth_user = pgbouncer
auth_query = SELECT p_user, p_password FROM public.lookup($1)
Save and close the editor when you are finished.
When you are finished with pgbouncer configuration, execute below command to start pgbouncer on each node:
sudo systemctl start pgbouncerTest PgBouncer Authentication
psql -h patroni1 -p 6432 -U pgbouncer -d postgres
This should connect you to your Postgres database if everything was configured correctly as described above.
Install HAProxy
With
patroni cluster, you need a method to connect to the leader
node regardless of which node is leader.
HAProxy forwards the connection to whichever node is currently the
leader. It does this using a REST endpoint that Patroni provides.
Patroni ensures that, at any given time, only the leader node will appear as online, forcing HAProxy to connect to the correct node. Database clients will connect to haproxy, and haproxy will make sure connecting to the leader node in the cluster.
You can install haproxy on your Ubuntu using the following command:
sudo apt -y install haproxy

sudo systemctl stop haproxy

sudo systemctl disable haproxy
Configure HAProxy
sudo mv /etc/haproxy/haproxy.cfg /etc/haproxy/haproxy.cfg.orig

sudo nano /etc/haproxy/haproxy.cfg
Add following configuration:
global
     log 127.0.0.1   local2
     log /dev/log    local0
     log /dev/log    local1 notice
     chroot /var/lib/haproxy
     stats socket /run/haproxy/admin.sock mode 660 level admin expose-fd listeners
     stats timeout 30s
     user haproxy
     group haproxy
     maxconn 4000
     daemon

defaults
    mode                    tcp
    log                     global
    option                  tcplog
    retries                 3
    timeout queue           1m
    timeout connect         10s
    timeout client          1m
    timeout server          1m
    timeout check           10s
    maxconn                 3000

listen stats
    mode http
    bind *:7000
    stats enable
    stats uri /

listen primary
    bind 192.168.10.200:5000
    option httpchk OPTIONS /master
    http-check expect status 200
    default-server inter 3s fall 3 rise 2 on-marked-down shutdown-sessions
    server patroni1 192.168.10.1:6432 maxconn 100 check port 8008
    server patroni2 192.168.10.2:6432 maxconn 100 check port 8008
    server patroni3 192.168.10.3:6432 maxconn 100 check port 8008

listen standby
    bind 192.168.10.200:5001
    balance roundrobin
    option httpchk OPTIONS /replica
    http-check expect status 200
    default-server inter 3s fall 3 rise 2 on-marked-down shutdown-sessions
    server patroni1 192.168.10.1:6432 maxconn 100 check port 8008
    server patroni2 192.168.10.2:6432 maxconn 100 check port 8008
    server patroni3 192.168.10.3:6432 maxconn 100 check port 8008
- primary using port 5000 for reads/writes requests.
- standby using port 5001 for only reads requests.
Install Keepalived
sudo apt -y install keepalived

sudo systemctl stop keepalived

sudo systemctl disable keepalived
Configure Keepalived
Edit /etc/sysctl.conf file on your first node (patroni1) in our case:
sudo nano /etc/sysctl.conf
net.ipv4.ip_nonlocal_bind = 1Save and close the editor when you are finished.
net.ipv4.ip_forward = 1
Type following command to reload settings from config file without rebooting:
sudo sysctl --system
sudo sysctl -p
sudo nano /etc/keepalived/keepalived.conf
vrrp_script chk_haproxy {
        script "pkill -0 haproxy"
        interval 5
        weight -4
        fall 2
        rise 1
}

vrrp_script chk_lb {
        script "pkill -0 keepalived"
        interval 1
        weight 6
        fall 2
        rise 1
}

vrrp_script chk_servers {
        script "echo 'GET /are-you-ok' | nc 127.0.0.1 7000 | grep -q '200 OK'"
        interval 2
        weight 2
        fall 2
        rise 2
}

vrrp_instance vrrp_1 {
        interface enp0s3
        state MASTER
        virtual_router_id 51
        priority 101
        virtual_ipaddress_excluded {
                192.168.10.200
        }
        track_interface {
                enp0s3 weight -2
        }
        track_script {
                chk_haproxy
                chk_lb
        }
}
Do not forget to replace the highlighted text with yours. Save and close the editor when you are finished. sudo nano /etc/keepalived/keepalived.conf
vrrp_script chk_haproxy {
        script "pkill -0 haproxy"
        interval 5
        weight -4
        fall 2
        rise 1
}

vrrp_script chk_lb {
        script "pkill -0 keepalived"
        interval 1
        weight 6
        fall 2
        rise 1
}

vrrp_script chk_servers {
        script "echo 'GET /are-you-ok' | nc 127.0.0.1 7000 | grep -q '200 OK'"
        interval 2
        weight 2
        fall 2
        rise 2
}

vrrp_instance vrrp_1 {
        interface enp0s3
        state BACKUP
        virtual_router_id 51
        priority 100
        virtual_ipaddress_excluded {
                192.168.10.200
        }
        track_interface {
                enp0s3 weight -2
        }
        track_script {
                chk_haproxy
                chk_lb
        }
}
Do not forget to replace the highlighted text with yours. Save and close the editor when you are finished.sudo nano /etc/keepalived/keepalived.conf
vrrp_script chk_haproxy {
        script "pkill -0 haproxy"
        interval 5
        weight -4
        fall 2
        rise 1
}

vrrp_script chk_lb {
        script "pkill -0 keepalived"
        interval 1
        weight 6
        fall 2
        rise 1
}

vrrp_script chk_servers {
        script "echo 'GET /are-you-ok' | nc 127.0.0.1 7000 | grep -q '200 OK'"
        interval 2
        weight 2
        fall 2
        rise 2
}

vrrp_instance vrrp_1 {
        interface enp0s3
        state BACKUP
        virtual_router_id 51
        priority 99
        virtual_ipaddress_excluded {
                192.168.10.200
        }
        track_interface {
                enp0s3 weight -2
        }
        track_script {
                chk_haproxy
                chk_lb
        }
}
Do not forget to replace the highlighted text with yours. Save and close the editor when you are finished.sudo systemctl start keepalivedVerify your network interface:
ip addr show enp0s3
Your (enp0s3) network interface is configured with an additional shared IP address (192.168.10.200) in our case, as shown in image below.

sudo systemctl start haproxy
sudo systemctl status haproxyTest Patroni Cluster
psql -h 192.168.10.200 -p 5000 -U postgres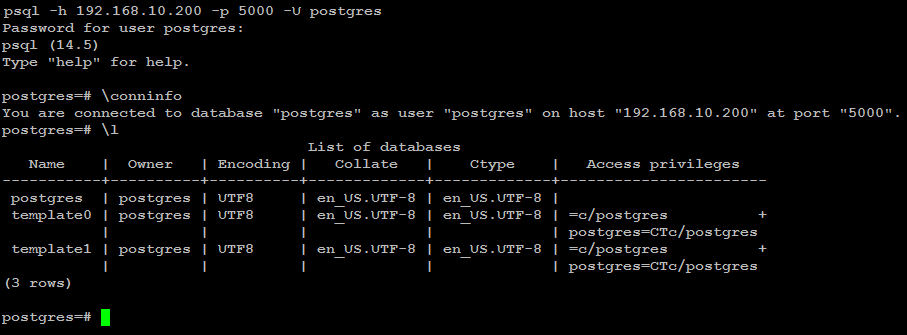
psql -h 192.168.10.200 -p 5001 -U postgres -t -c "select inet_server_addr()"
psql -h 192.168.10.200 -p 5001 -U postgres -t -c "select inet_server_addr()"
Next, execute the same command again but this time using port 5000:
psql -h 192.168.10.200 -p 5000 -U postgres -t -c "select inet_server_addr()"

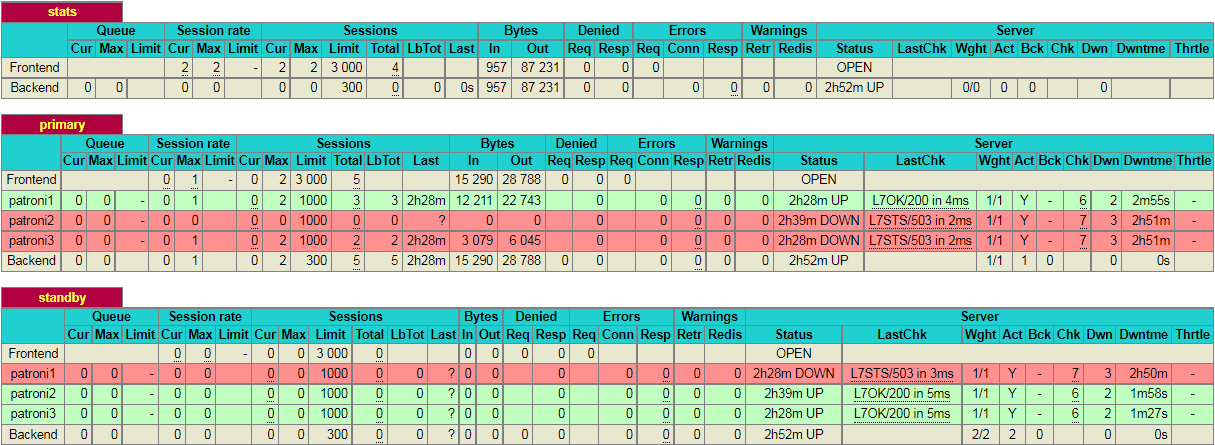
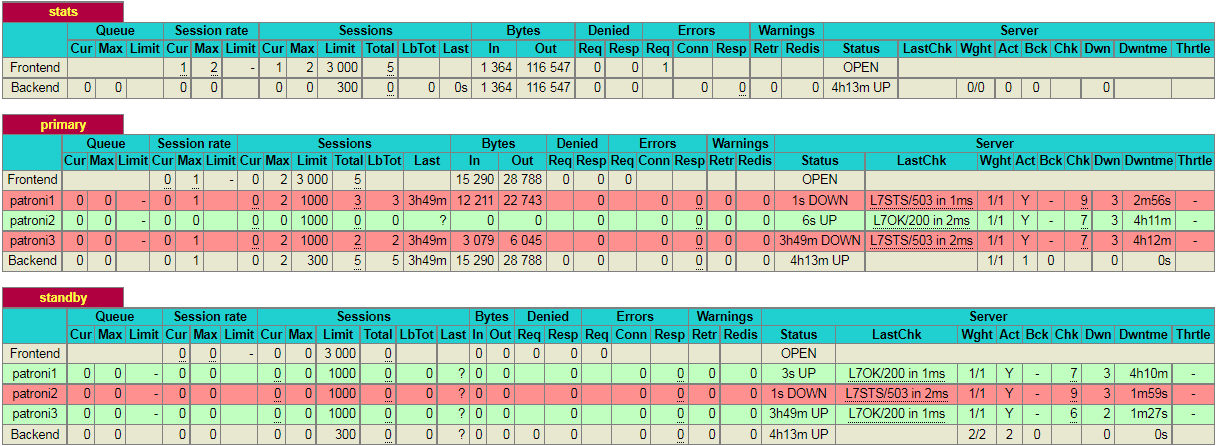
Please note that, in this particular scenario, it just so happens that the second node in the cluster is promoted to leader. This might not always be the case and it is equally likely that the 3rd node may be promoted to leader.
Test Postgres Database Replication
We will create a test database to see if it is replicated to other nodes in the cluster. For this guide, we will use (psql) to connect to database via haproxy like below:
psql -h 192.168.10.200 -p 5000 -U postgresFrom the Postgres prompt, create a test database like below:
create database testdb;
create user testuser with encrypted password 'mystrongpass';
grant all privileges on database testdb to testuser;

\q
Update your userlist.txt file on each node for testuser as explained in PgBouncer section.
Stop patroni on leader node (patroni1) in our case with below command:
sudo systemctl stop patroniConnect to database using psql again, this time haproxy will automatically make connection to whichever node is currently leader in the cluster:
psql -h 192.168.10.200 -p 5000 testuser -d testdbAs you can see in the output below, connection to testdb was successful via haproxy:

Now bring up your first node with (sudo systemctl start patroni), and it will automatically rejoin the cluster as secondary and automatically synchronize with the leader.
Test Patroni Cluster Failover
sudo patronictl --helpOptions:
-c, --config-file TEXT Configuration file
-d, --dcs TEXT Use this DCS
-k, --insecure Allow connections to SSL sites without certs
--help Show this message and exit.
Commands:
configure Create configuration file
dsn Generate a dsn for the provided member, defaults to a dsn of...
edit-config Edit cluster configuration
failover Failover to a replica
flush Discard scheduled events (restarts only currently)
history Show the history of failovers/switchovers
list List the Patroni members for a given Patroni
pause Disable auto failover
query Query a Patroni PostgreSQL member
reinit Reinitialize cluster member
reload Reload cluster member configuration
remove Remove cluster from DCS
restart Restart cluster member
resume Resume auto failover
scaffold Create a structure for the cluster in DCS
show-config Show cluster configuration
switchover Switchover to a replica
version Output version of patronictl command or a running Patroni patronictl -c /etc/patroni/config.yml list
patronictl -c /etc/patroni/config.yml history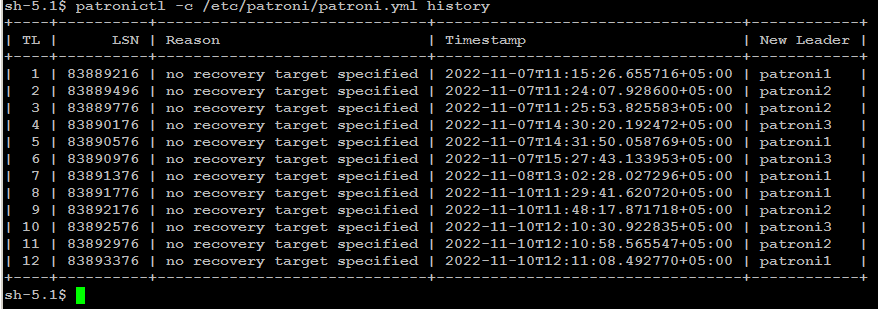
patronictl -c/etc/patroni/config.ymlfailover

Disable Patroni Cluster Auto Failover
In some cases it is necessary to perform maintenance task on a single node such as applying patches or release updates. When you manually disable auto failover, patroni won’t change the state of the PostgreSQL cluster.
You can disable auto failover with below command:
patronictl -c /etc/patroni/config.yml pause
Patroni Cluster Switchover
There
are two possibilities to run a switchover, either in scheduled mode or
immediately. At the given time, the switchover will take place, and you
will see an entry of switchover activity in the log file.
patronictl -c /etc/patroni/config.yml switchover --master your_leader_node --candidate your_replica_node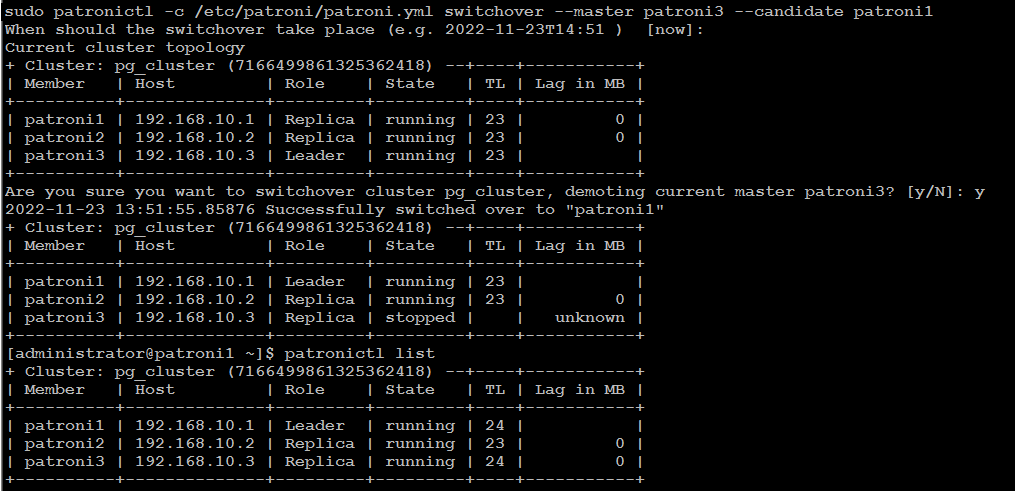
Simulate Patroni Cluster Failure Scenario
To simulate failure scenarios in production environment, we will execute continuous reads and writes to the database using a simple Python script as we are interested in observing the state of the cluster upon a server failure.
You should have a workstation (physical or virtual) with any of your favorite Linux distribution (Ubuntu or Debian) installed.
Type following command to install PostgreSQL client, and driver for python on your Linux workstation:
sudo apt -y install postgresql-client python3-psycopg2
cd ~

git clone https://github.com/manwerjalil/pgscripts.git

chmod +x ~/pgscripts/pgsqlhatest.py
nano~/pgscripts/pgsqlhatest.py
# CONNECTION DETAILS
host = "Type_HAProxy_IP_Here"
dbname = "postgres"
user = "postgres"
password = "Type_postgres_password_Here"
To get the best result, we will use tmux terminal for multiple tabs to monitor state of the patroni cluster all together in real time:psql -h 192.168.10.1 -p 5432 -U postgres -c "CREATE TABLE PGSQLHATEST (TM TIMESTAMP);"
psql -h 192.168.10.1 -p 5432 -U postgres -c "CREATE UNIQUE INDEX idx_pgsqlhatext ON pgsqlhatest (tm desc);"
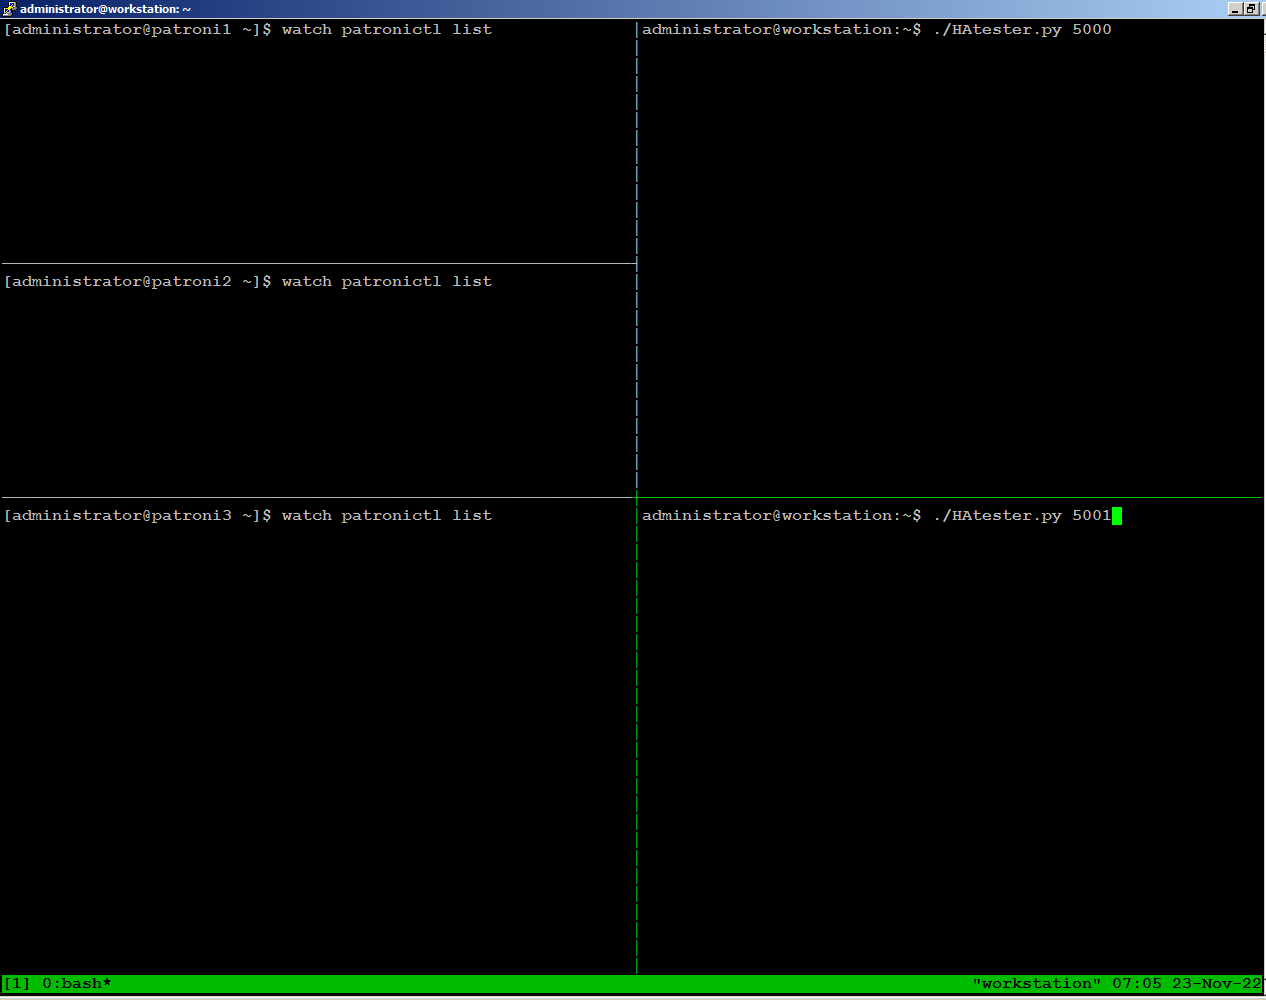
On the right side of the screen, we are running python script sending writes through port 5000, and reads through port 5001 from our workstation:
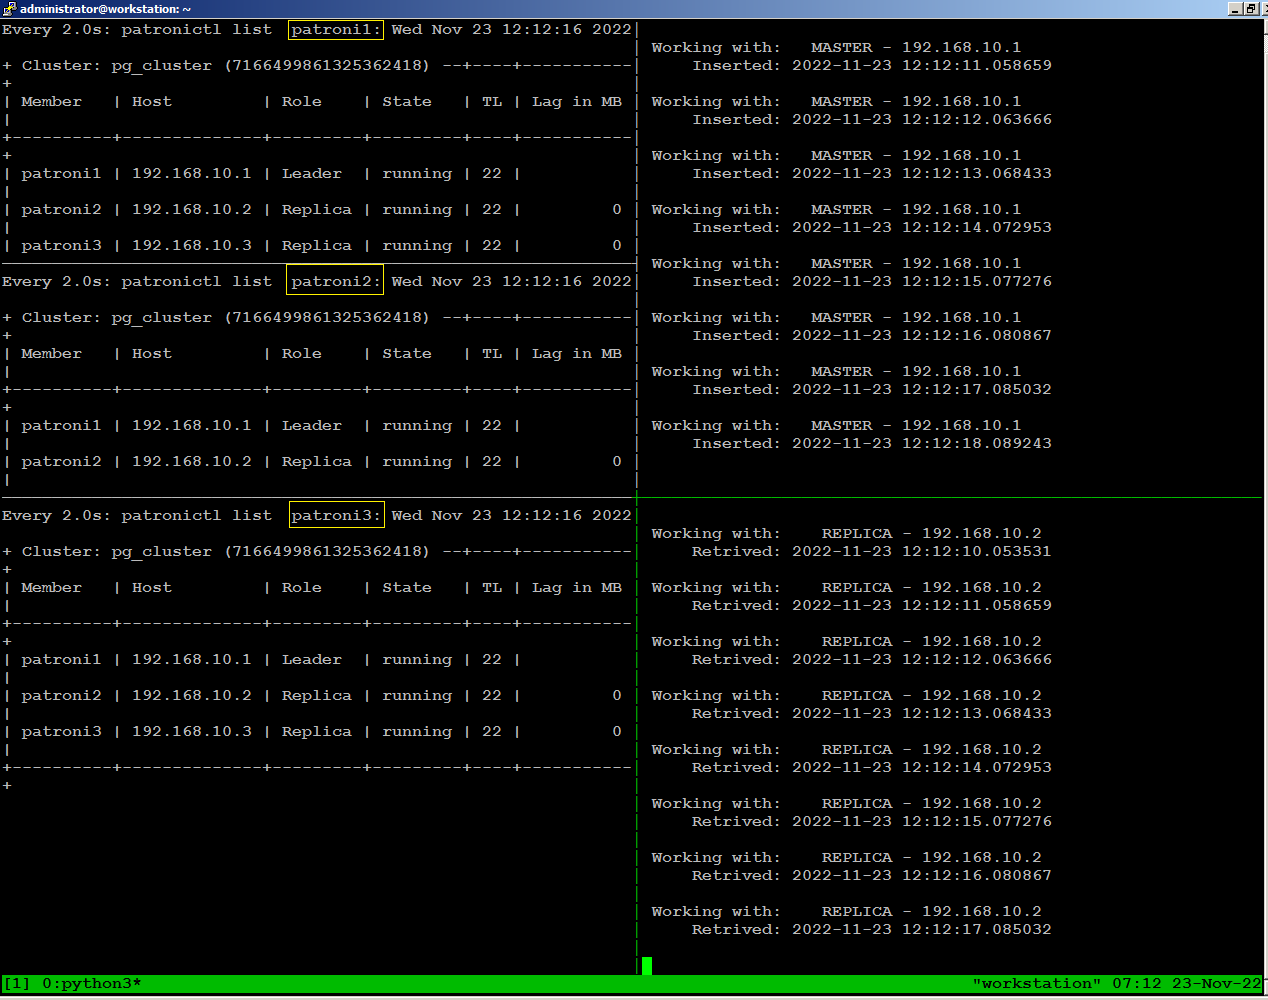
sudo systemctl stop patroni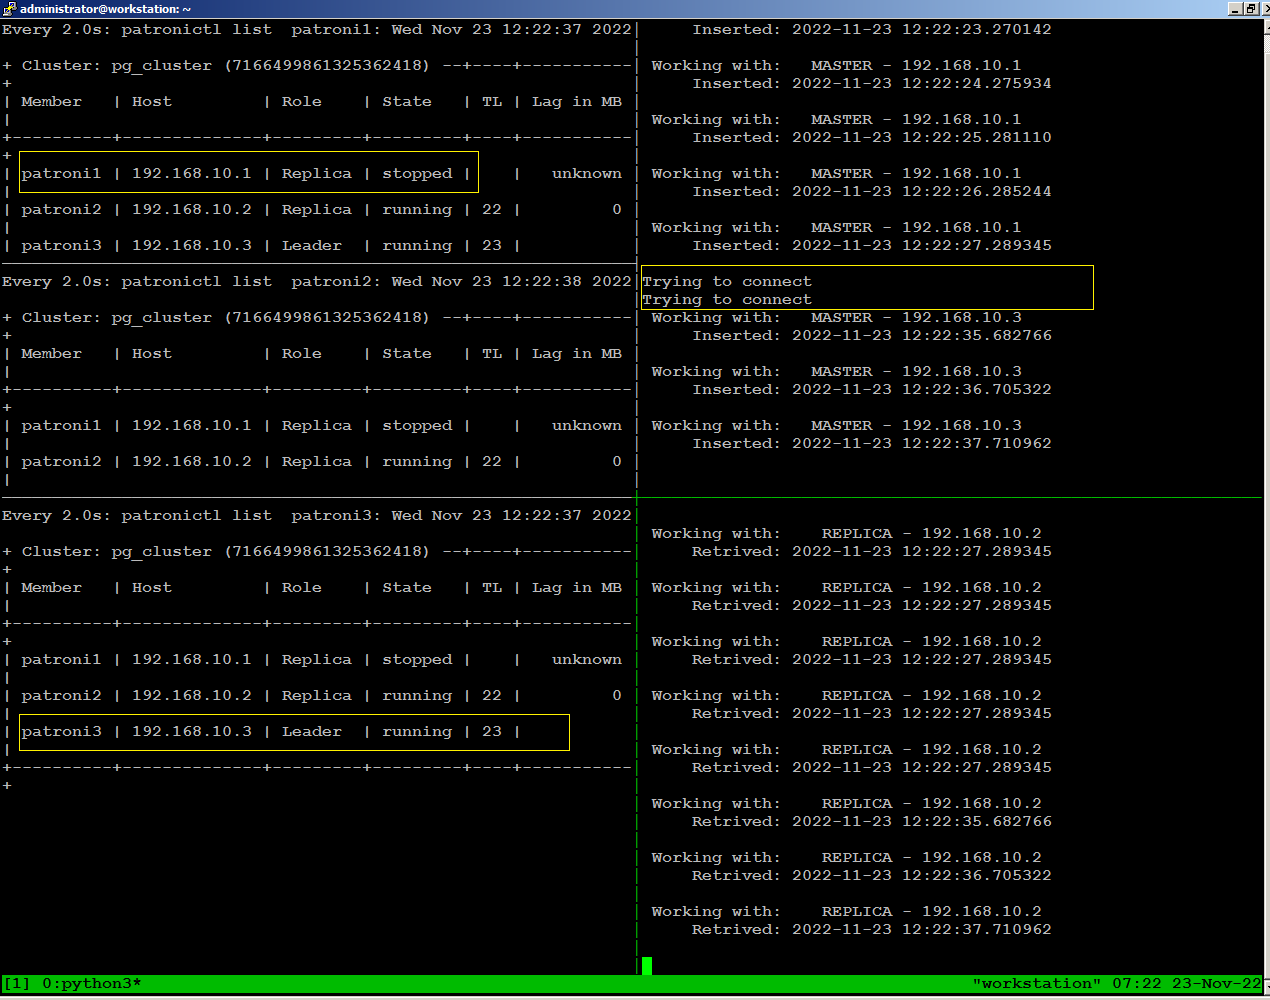
sudo systemctl start patroni
Test Environment Failure Scenarios
- Loss of network connectivity
- Power breakdown
When simulating these tests, you should continuously monitor how the patroni cluster re-adjusts itself and how it affects read and write traffic for each failure scenario.


I'm just about to run though this installation guide. It looks really good and I'm a bit surprised there are no comments.
ReplyDeletesame here, it's incredible. Did you try?
Delete